Rosemary and Cayenne Soda Bread

Rosemary and Cayenne Soda Bread

Week 3 of Great British Bake Off 2015 was ‘Bread Week’ with the contestants starting off with a Soda Bread, before moving onto the technical baguette and then the more elaborate show-stoppers!

Rosemary and Cayenne Soda Bread

Rosemary and Cayenne Soda Bread

So naturally I started off with the easiest option of soda bread. Not a bred I’ve made before so I turned to my trusty ‘bread book’ Short and Sweet by Dan Lepard for inspiration. This cook book doesn’t have a huge amount of photos but more than makes up for this with tonnes of recipes! I once saw Dan Lepard showcasing his bread making techniques at a food festival so have admired his bread making since. An Aussie version of Paul Hollywood!

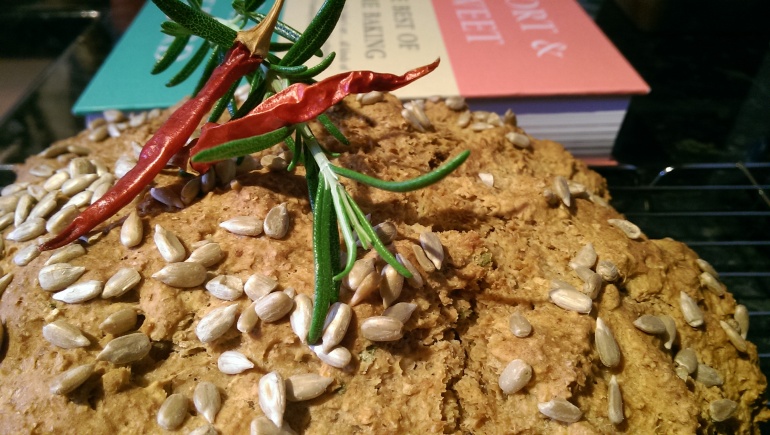
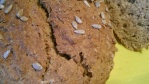
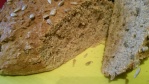
The basis of this recipe is Dan Lepard’s ‘Breakfast Soda Breads‘ which recommends putting together the ‘dry’ ingredients and storing them for when you want to bake up some fresh rolls. Not a bad idea since I often struggle to eat bread before it starts to go stale. However this time I wanted to bake a whole loaf so I used the same basic recipe but added used some rosemary from my kitchen garden, then threw in some cayenne and chilli flakes for a bit of a kick! I also topped the loaf with some sunflowers seeds because they were closer than the rolled oats.

The great thing about baking this soda bread is that there is no kneading and proofing involved, so it’s really a quick bread!

For ease of reference, I’ve copied the recipe below:

For the dry mix

  • 450g wholemeal flour
  • 3 level tsp baking powder
  • ½-¾ tsp salt
  • 2 tbsp muscovado sugar

For every 75g of dry mix (per bread roll)

  • 50-75ml cold whole milk (390ml in total)
  • 30ml plain yoghurt (180g in totol)
  • 15cm square of baking paper
  • Rolled oats, to finish (Or any seeds you have to hand)
  • Extra flavours- 3 sprigs Rosemary (finely chopped), 1 tsp Chilli Flakes, 1 tsp Cayenne Pepper

Method:

  • Sift the dry ingredients together, so the baking powder and salt are evenly mixed. Add any herbs and spices you want at this point.
  • Preheat the oven to 200C (180C fan-assisted)/400F/gas mark 6.
  • Stir the required quantity of milk and yoghurt into your dry mix.
  • Position squares of baking paper over each pocket of a muffin tray, then spoon about 150g into the centre of each. Gently press the mixture and paper down into the pocket.
  • Sprinkle a few rolled oats (or seeds) over the soda breads and bake for 25 minutes, until puffed and brown. Serve warm. If baking one large loaf, then bake for 50-60 minutes or until done.

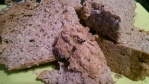
I baked this loaf twice as the first time it was slightly under-baked in the middle, as I didn’t slash the loaf in the middle. The second time I baked it I added some extra rosemary and reduced the amount of salt but felt that the flavour of the first loaf was better. I think I’ll try other soda bread recipes to see how they compare!

Rosemary and Cayenne Soda Bread

Rosemary and Cayenne Soda Bread

In another ‘Short and Sweet’ recipe for ‘Ale House Rolls’ he suggests part baking the rolls before freezing them then baking them from frozen for 10-12 minutes when required. I like this idea and reckon it would work with any breads! Worth a try…

Looking forward to week 4 of Great British Bake Off 2015! 🙂

No Knead Loaf

No Knead Bread: Attempt Number 2

No Knead Loaf

No Knead Loaf

After the last disappointing attempt at the No Knead Loaf I decided that I would give it another go but this time taking the advice of SurpriseSaffron and baking two smaller loaves to ensure the bread is properly cooked all the way through. And guess what?! It worked! 😀

No Knead Loaves

No Knead Loaves

I also adjusted the ingredients in the recipe a little and left the dough to proof for longer, et voile! A couple of perfectly baked loaves that were super tasty and evenly textured all the way through…

No Knead Bread

No Knead Bread


New recipe:

  • 360g strong wholemeal flour
  • 140g strong white flour
  • 375ml warm water
  • 1tsp dried instant ‘hand baking’ yeast
  • 1tsp honey
  • 1.5tsp sea salt

New Method:

  • Mix everything up and leave in a cling film covered bowl for between 16 and 18 hours (In the UK, our clocks went forward by an hour today, so technically I left by dough to proof for 17 hours…)
  • Pre-heat oven to 220 degrees C, and knock back the dough
  • Halve the dough and shape into two loaves and leave to proof for another 10-15 minutes as the oven gets hot
  • Spray water onto the top of the loaves and bake for 40-45 minutes (or until done). Allow to cool before cutting otherwise the dough gets mushy!
No Knead Loaf

No Knead Loaf

I’m glad I decided to try ‘no knead bread’ again. It takes very little effort and the results are just as good as the traditional twice kneaded, twice proofed home made bread. I’d go as far as to say it’s even tastier than bread made in the bread machine! I think the taste comes from the long fermentation of the yeast…


No Knead Seeded Wholemeal Loaf

No Knead Bread

No Knead Bread

What happens when you forget to program the bread machine? Another experiment! 🙂 So, yes I forgot to turn on the bread machine! So I returned home in the late evening to a soggy mush of flour, water and yeast with not enough time to set the machine to bake for three and a half hours. Not wanting to waste good ingredients, I decided to try out the ‘no knead bread’ theory… I’m fairly inexperienced in bread making. Mainly because I don’t have the patience for all the kneading and waiting around for the proving. It is great if you have a lot of time in the house that day and you’re doing chores or you can give the dough a quick knead in between writing blog posts. However I don’t have this situation come up very often so the bread machine has been a happy compromise! Until I forget to turn it on… 😦 So all I did with this bread was to mix all the ingredients into a rough ball of dough, then left in a cling film covered bowl over night (around 10 hours in total) then punched it down and formed into a ball to bake in the oven.

No Knead Bread

No Knead Bread

Ingredients

  • 360g strong wholemeal flour
  • 140g strong white flour
  • 1.5 tsp bread machine yeast
  • 375 ml water
  • 1 tbs olive oil
  • 1 tbs agave syrup
  • 1 tsp sea salt
  • poppy seeds
  • pumpkin seeds
No Knead Bread

No Knead Bread

After baking in a hot oven for 40 minutes, I took the bread out. I did the tapping test and it sounded done. However upon cutting into the middle of the loaf, I found that it was under-baked so I stuck it back in the oven. This didn’t really help much as it was still quite mushy in the middle and the crust was just getting harder and harder! So my fellow bloggers, what has gone wrong?! The taste of the bread wasn’t great. it was bland and the poppy seeds didn’t really come through. The texture was OK (where it was cooked!), as you can see from the photos the dough was quite cakey and the air pockets are very small but the crumb was nice and crisp.

No Knead Bread

No Knead Bread

The things I think could have gone wrong are:

  1. I’ve used the wrong type of yeast (I have two types, one for bread machines and one for hand kneading- both are dried fast action)
  2. The oven wasn’t hot enough
  3. Wrong measurements for the ingredients required for ‘no knead’ bread.

I reckon that if I can master the art of no knead bread, then I can make a bit more space on the kitchen work tops by getting rid of the huge bread machine and maybe getting an ice-cream maker instead?! 😉


Update on 30 March 2014:

Not one to be beaten, I have attempted to bake this no knead bread again! Taking tips from SurpriseSaffron and making some slight adjustments to the ingredients, I have successfully baked a decent ‘No Knead’ Loaf!

No Knead Loaf

No Knead Loaf


Mini salted caramel and chocolate cakes and other Christmas bakes

Mini Salted Caramel and Chocolate Cakes

Mini Salted Caramel and Chocolate Cakes

I’ve not posted over the Christmas period, but that’s not because I haven’t been baking! Only because I’ve not baked any new recipes. What I have learnt is that when time is of the essence, never bake something you are not already familiar with!

In the past week, I’ve baked a lot of shortbread, made trays of truffles and bags of candied almonds. I also baked 2 kilos of roast potatoes and dinner rolls for the family Christmas dinner.

Christmas Dinner Rolls

Christmas Dinner Rolls: Wholemeal, Seeded, Sundried Tomato and Parmesan

Although I say that I don’t like to try new recipes when I’m under time pressure, I did try a new technique with these dinner rolls. I’ve been toying with the idea of not kneading the dough for the usual 8-10 minutes before the first proofing. Dan Leopard advocated this method a lot and I did try it once but it went badly wrong. However I’ve had a bit more bread making practice since then so I have more confidence working with yeast. So for these dinner rolls, I kneaded them until the dough had come together then proofed it a few times kneading a little in between. The bread turned out pretty well and exactly how bread should! Score!

Rosemary Roast Potatoes

Rosemary Roast Potatoes

These roast potatoes also turned out quite nice. In my family we all help out a little to make Christmas dinner so we share the work load and the oven space! I’ve done the roast potatoes for the past few years. Thinking about it, I think Christmas is the only time I actually make roast potatoes! 🙂

I don’t think I have much time to back again until the new year now. Looking back at when I started this blog at the beginning of October 2013, I’m fairly happy with the results so far… This blog has helped to keep me on track with my baking and encouraged me to try out new recipes. I’ve also discovered lots of new recipes from fellow bloggers and been inspired by their words. Onwards and upwards in 2014!

Happy New Year everyone! May 2014 bring you and your loved ones good health, wealth and happiness…

Ciabatta: Learning how to work with sour dough

Ciabatta: Second attempt

Ciabatta: Third attempt

Bread is a staple food in our household. We go through mountains of store bought wholemeal pita bread because its is tasty and easy to throw in the toaster straight from the freezer! Pita is great for scooping up whichever curry or stew has been made for a mid-week dinner. One day I want to try and make my own pita bread…

After a recent trip to abroad, my partner came home asking me to make some ciabatta as he had really enjoyed the bread whilst away. I’ve never tried to make a sour dough bread before. It’s always seemed a big challenge as the ‘starter’ takes at least 7 to 10 days to get going before it can be used. A few years ago I went on a bread making workshop for beginners and learnt about the science behind the craft. Sour dough breads were mentioned and some of the more experienced students were sharing stories about ‘feeding’ their starter. It was all a bit scary sounding so I put it to the back of my baking mind.

When looking up ciabatta recipes, I found that it was made with a similar ‘starter’ called ‘biga’ that only needed to be made the night before so using this recipe I set about on this new challenge! While researching ciabatta recipes I also found out that the meaning in Italian is ‘slipper bread’ because it looks like an old man’s slipper!

Ciabbatta: one with sun-dried tomatoes and mixed herbs

Ciabatta: one with sun-dried tomatoes and mixed herbs

Ciabatta

Ciabatta

When making these loaves the dough was so wet that it wouldn’t hold a shape so I resorted to using cake loaf tins to bake them in, hence the different shapes and sizes! I added some sun-dried tomatoes and mixed herbs to add flavour to one loaf, which proved worthwhile as the flavour was delicious!

During my second attempt at this recipe I managed to get the consistency of the dough much better as they could be baked ‘free form’, however I’ve forgotten to take pictures!

For my third attempt at ciabatta, I found that the taste and the bread didn’t have the characteristic big holes in the middle as in previous attempts. This may be because I used a different recipe or it could be because it’s freezing cold in Manchester these days, and may too cold for the biga so it may have just been dormant overnight. The depth of flavour wasn’t there and though the dough was very bubbly when proving. Next time I want to try and make it from whole meal flour!

Compared to standard home made bread (baked in a bread machine) the taste of ciabatta is far superior. However remembering to do the ‘biga’ the night before is still a challenge for me so this will have to be a weekend bread to make when I have more time and don’t have a 6am start!

Ciabatta: Second attempt

Ciabatta: Third attempt


Fun With Bread: Stuffed rabbits and garlic dough balls


Bunny Rolls with Garlic Dough Balls

Bunny Rolls with Garlic Dough Balls

It is a well known fact that we eat with our eyes first. Food should look appealing as well as taste good, but it is also important to get the balance right.

I regularly go to my sister’s house at weekends for dinner. She’s a mum and works full time so I try and bring something along to ease the burden a little. This weekend she made a very complicated but delicious fish lasagne recipe, from one of Jamie Oliver’s cookbooks. I offered to make the garlic dough balls to go on the side.

The weather in the UK has turned for the worse. It’s rainy, windy and generally pretty miserable out. This has had a pretty drastic effect on my bread making. Having decided to make the dough by hand, it just wasn’t rising during the proving as the kitchen was too cold. As a last resort I had to stick it into a warm oven which helped a little but I think it was a little too late as the dough still refused to rise much.


Garlic Dough Balls with Parmesan Cheese

Garlic Dough Balls with Parmesan Cheese

Bunny Rolls with Garlic Dough Balls

Bunny Rolls with Garlic Dough Balls

To make the dough balls taste a little more exciting, I made half the dough into dinner rolls but stuffed them with sun-dried tomatoes and parmesan cheese. Looking a little uninteresting, I decided to snip in a couple of ears of poke in a couple of eyes to make them into cute little rabbits.

Now you would think that my two and a half year old nephew would love these little rabbits, since he’s completely obsessed with animals! However he seemed pretty indifferent and slightly bemused. He was however much more interested in the garlic dough balls, ploughing through the bowl one by one.

It may be true that you eat with your eyes but at the end of the day its the taste that really counts. Since the ‘rabbits’ could easily have been ‘cats’ or ‘mice’, I think I only passed the taste test on this one!