Fesenjan: Iranian Chicken, Walnut and Pomegranate Stew

Fesenjan

20160904_132624

Fesenjan: Iranian Chicken, Walnut and Pomegranate Stew

I’ve recently been trying a lot of home cooked Iranian/Persian foods and am really enjoying the intensity of the flavours that are so different from the other Asian foods I’ve had before. I’ve experimented with different recipes and I’ve cooked this fesenjan a few times, I’ve been told it tastes very authentic so I’m sharing the recipe I’ve adapted from this online version from the New York Times.  Fesenjan is typically eaten during special occasions in Iran, I like to make it when I have friends for dinner.

Having eaten this dish in various Persian restaurants in my home town, I think I’ve come close to the real deal! It’s not a particularly ‘pretty’ dish but it tastes amazing with a depth of flavour that is rare in a stew that only takes just over an hour to cook. It goes without saying that it tastes even better if left for a day to let the flavours melt together even more!

A word of advice to begin with, the sauce is meant to be very thick and ‘oily’ as the natural oils from the walnuts rise to the surface. Just mix the sauce up to combine the oil again. This recipe does not have any additional oil so it’s a pretty healthy dish overall!

 Ingredients:

  • 8-10 chicken drumsticks and thighs (use chicken breast if you prefer but that can end up quite dry due to the long cooking method)
  • 200g shelled walnuts, roasted and ground into a fine powder
  • 1 medium white onion, finely diced
  • 150 ml pomegranate molasses
  • ¼ tsp cinnamon
  • ¼ tsp nutmeg
  • water
  • salt to taste
  • sugar to taste
  • Fresh pomegranate seeds, to serve


Method:

  • Start by roasting the walnuts in the oven for 5 minutes at 150 degrees C. Turns them half way through to avoid burning. Let them cool then grind them into a fine powder, but don’t let it turn into a walnut butter!
  • In a large saucepan (with a fitted lid) add the ground walnuts, diced onion and 200ml water (or until the nuts and onions are just covered), allow to simmer with the pan lid on tight for 20 minutes. Stir every 5 minutes and check if more water is needed so the nuts don’t stick and burn.
  • In the meantime fry off the chicken pieces in a frying pan, no need for extra oil and the natural chicken fats will do that for you. Fry until lightly golden on all sides, no need to fully cook as that happens in the lovely sauce later.
  • Add the pomegranate molasses and ground spices to the stewed nuts and onions, mix it all in then add the fried off chicken pieces. Mix it all up with 2 tsp salt and allow to simmer with the pan lid slightly ajar for around 20 minutes. At this point the sauce becomes very ‘watery’ from the chicken juices. Keep stirring it to stop the sauce from sticking to the bottom of the pan and leave the lid off for a further 20 minutes of cooking or until the sauce becomes really thick and coats the chicken pieces well.
  • Add extra salt and sugar to taste. This stew is meant to be on the sour side but I’ve found that different brands of pomegranate mollasses require a little adjustment as they can be quite tart!
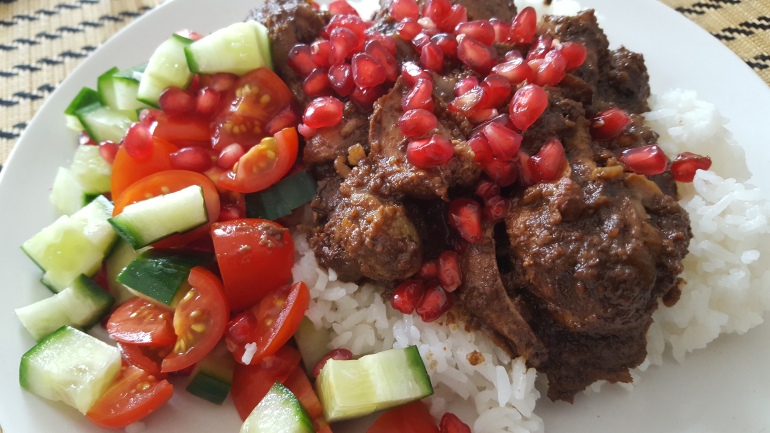
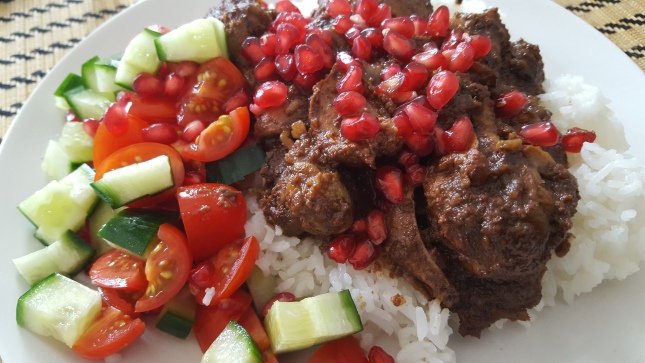
  • Serve topped with fresh pomegranate seeds and steamed rice, with a bit of salad


20160904_132624

Fesenjan: Iranian Chicken, Walnut and Pomegranate Stew

This is a very rich and heavy meal so the pomegranate seeds and salad help to lighten and lift the flavours somewhat.

Chicken and Choy Sum Udon Noodles

Chicken and Choy Sum Udon Noodles

Chicken and Choy Sum Udon Noodles

Chicken and Choy Sum Udon Noodles

Chicken and Choy Sum Udon Noodles

These noodles are great for a quick mid week meal. With any ‘stir fry’ you can add whatever ingredients you like, no matter how little you have so it is great for using up left over vegetables. Udon noodles originate from Japan, are made from wheat flour, and can be bought handy in ‘straight to wok’ individual servings. As well as stir-frying you can also put them into a noodle soup so they are very versatile! Leave out the chicken or substitute with fried tofu for a filling vegetarian alternative.

Ingredients: (serves 4)

  • 3 small packets of udon noodles
  • 3 boneless chicken thighs (diced)
  • 1 white onion (sliced)
  • Small bunch of Choy Sum (chopped, separating the leaves and the stalks)
  • 2 tbs light soy sauce
  • 1 tbs sesame oil
  • Small handful of cashew nuts (lightly crushed), to serve

Method:

  • Stir-fry the chicken thighs in a dry wok, or deep frying pan, there should be enough fat from the chicken so no extra oil needed
  • Add the white onion and stir-fry until translucent
  • Add the stalks of the Choy Sum and the noodles, separating them out so they don’t clump together
  • Add the soy sauce and sesame oil, stir fry until the noodles are warmed through
  • At the last minute add the leaves of the Choy Sum, they will wilt in the residual heat
  • Sprinkle with cashew nuts when serving to add additional crunch
Chicken and Choy Sum Udon Noodles

Chicken and Choy Sum Udon Noodles


Tofu Stir Fry with Chicken and Chorizo rice

Chorizo and Chicken Rice with Tofu and Vegetable Stir Fry

Tofu Stir Fry with Chicken and Chorizo Rice

Tofu Stir Fry with Chicken and Chorizo Rice

I have previously posted a recipe for Macau Portuguese Baked Rice. This time I have used the same flavour combinations but simplified the recipe for a quicker meal that takes less than 30 minutes to put together and serve for a mid week dinner. Refer to the previous recipe, but skip the cheese and boiled eggs so the rice is only steamed on the stove. I poached some chicken with cloves, bay leaves and garlic then left it in the fridge, for when I was cooking this dish. However any left over roast chicken will work too.

Chorizo and Chicken Rice

Chorizo and Chicken Rice

To go with the rice, I quickly stir-fried some ready cooked fried tofu with some chopped leeks, mange tout, celery and mushrooms. These are basically the vegetables I had in the fridge/freezer so any you have to use up could work too.

Tofu Stir Fry

Tofu Stir Fry

Fried tofu is a great vegetarian staple to have in the fridge for a quick and nutritious meal. They can be bought in bags in Asian supermarkets (look in the fridges) or you can deep fry your own tofu.

Fried Tofu Sticks

Fried Tofu Sticks

To add flavour to the tofu and vegetables, I used a couple of table spoons of vegetarian stir-fry sauce (an alternative to oyster sauce), light and dark soy sauce, and sesame oil. The tofu soaks up all the flavours like a sponge, so you can add what ever you like to the sauce. I added a few splashes of water too as the dish was a little too dry. Remember not to over cook the vegetables as you’re looking for the crunchy texture to contrast the soft tofu!

Tofu Stir Fry with Chicken and Chorizo rice

Tofu Stir Fry with Chicken and Chorizo rice

This tofu dish can be served with plain rice or egg fried rice for a filling vegetarian meal.

If you are avoiding gluten, double check the label of the chorizo and cooking sauces for gluten. Gluten free versions can usually be found!

Chicken Tikka and Sweet Potatoes

Chicken Tikka and Roasted Sweet Potato

Chicken Tikka and Sweet Potatoes with yoghurt

Chicken Tikka and Sweet Potatoes with yoghurt

Another quick one-pot mid-week meal!

This is a really simple recipe using a few ingredients and made in advance ready for 45 minutes in the oven.

I bought a free range corn fed chicken and spatchcock-ed (is that really a word!) it so it would cook quicker. The tikka paste used was a shop bought ‘Pataks’ one that was rubbed all over the chicken once it had been slashed in the thickest parts (to allow the flavour to be soaked in as well as too aid faster cooking).

Chicken Tikka and Sweet Potatoes

Chicken Tikka and Sweet Potatoes

Then a few sweet potatoes were cubed and scattered around the chicken in a roasting tin. Salt and pepper added and a little cooking oil sprayed on the sweet potatoes to help crispen them up.

After 45 minutes in 180 degree C oven, check that the chicken in cooked through. Then chop it up and serve on a bed of sweet potatoes, some cooling yoghurt, and some green salad. This dish feeds two hungry adults for dinner with left overs for lunch the next day too!

Chicken Tikka and Sweet Potatoes

Chicken Tikka and Sweet Potatoes

Simple! 🙂


Spanish Style Chicken: A Quick One Pot Mid-Week Meal

Spanish Style Chicken with Sour Cream

Spanish Style Chicken with Sour Cream

This is the second time in a week I have eaten this meal. The first time was when I went to a friend’s house for dinner. I like it so much that I asked for the recipe and planned to make it again for a mid-week meal.

I have a group of friends that I have known since I was 11 years old. We all went our separate ways for university and have come back together again in adult life as everyone has begun to settle down and start families etc. Since life is so busy we try and meet at least once a month by taking it in turns to cook a 3 course meal and having the girls over for dinner. We’ve been doing it for a while now and it’s working out really well!

So this month we had a lovely Tomato and Red Pepper Soup, Spanish Style Chicken and Chocolate Fudge Cake with Vanilla Ice-cream. How lucky am I? 🙂

So this recipe is from one of the Hairy Biker’s diet cookbooks. I love the Hairy Bikers! I think they are lovely, down to earth guys who love to eat, and share their love of food with everyone. They are great at making recipes that don’t require lots of fancy ingredients and hence do not cost a lot to put together!

To make it an easy one-pot meal I pre-prepared the potatoes by first part cooking them in the micro-wave the night before. You only need to quarter the potatoes and microwave them for 5 minutes then leave to cool! This is my version of the recipe (because I just did it from memory rather than looking up the actual recipe first!).

Baked Spanish Style Chicken

Baked Spanish Style Chicken

Ingredients

  • 6 red skin potatoes (quartered and part cooked in the microwave- see above)
  • 1 medium red onion (chopped into largish pieces)
  • 1 red pepper (chopped into largish pieces)
  • 1 courgette (chopped into largish pieces)
  • 2 handfuls of Chestnut mushrooms (halved)
  • 2 fresh tomatoes (quartered)
  • Chorizo (I used about 8 thin slices as that is all I had- best to get a whole sausage and chop up)
  • 6 chicken thighs (skin on and with bone)
  • 2 tsp paprika
  • 2 tsp dried herbs
  • 2 tsp olive oil
  • 2 tbs tomato purée
  • salt and pepper to taste
  • sour cream- to serve

Method

  • In a large casserole/baking dish. Put in everything and toss it all together to evenly coat all the vegetables with the tomato purée and olive oil.
  • Lay the chicken pieces on top (skin side up)
  • Bake at 200 degrees C for about 45-50 minutes or until the chicken is cooked through. Check on it half way through as you may need to turn the vegetables a little. I kept the potatoes near the top so they crispen up a little.
  • Serve in dishes with some sour cream.
Baked Spanish Style Chicken with Sour Cream

Baked Spanish Style Chicken with Sour Cream

This is a great one-pot midweek meal that is so easy to put together and the left-overs can be used up for lunch the next day. I made it a couple of days in advance so the flavours got a chance to mix together more. These days I try and prepare healthy mid-week meals in advance so they can be put straight into the oven with little fuss. And since the weather is terribly cold and miserable at the moment, having a hot and nicely spiced meal brings so much satisfaction after a long day at work! So if you have any suggestions, please feel free to share! 🙂

Macau ‘Portuguese’ Baked Rice

Following on from the previous post on Macau/Portuguese Custard Tarts I would like to share with you another dish from Macau, China.

Macau Baked Chorizo and Chicken Rice

Macau ‘Portugeuese’ Baked Chorizo and Chicken Rice

This ‘Portuguese inspired’ dish is well known throughout Macau and Hong Kong but will probably never be found in Portugal! It’s similar to a pilau,  paella or risotto, as it is mainly based but flavoured with spices and containing some form of meat/fish and vegetables. There are lots of variations to this dish but they are usually topped with grated cheese and finished off in the oven to get the crispy top. Cheese and rice may sound a little strange at first, but then again isn’t parmesan a main ingredient in the finishing of a risotto?

So this is my mum’s recipe, not sure where she got it from though… It makes enough for 6-8 people!

You’ll need 3 pans, one large casserole dish, one medium saucepan (for the chicken) and one large saucepan (for the rice)

Ingredients:

  • 4 chicken leg quarters
  • 4-5 bay leaves
  • 10 whole cloves
  • Salt and pepper to taste
  • 250g spicy chorizo (chopped into 1cm rounds)
  • 2 medium white onions (chopped into small pieces)
  • 2 tsp Oil
  • 300g white rice (washed and ready to steam)
  • 4 whole eggs
  • 100g grated cheese ( I used extra mature coloured cheddar)


Method:

  • Put chicken legs , bay leaves , a pinch of salt and the cloves in a covered pan of boiling water and simmer for 20 minutes then turn off the heat, leaving the pan to one side so the chicken soaks up the flavours of the stock. The chicken should be left to steep for at least 2 hours so it takes in the flavours. Start preparing the next step…
  • In a large sauce pan sauté the white onions for a couple of minutes in the cooking oil then add the chopped chorizo and sauté for a few minutes. The paprika from the chorizo will colour the onions nicely and the chorizo fats will also start coming out. This is good as it will help to colour and flavour the rice.
Sauted Chorizo and White Onions

Sauted Chorizo and White Onions

  • Add the washed rice to the chorizo and onion mix and enough water so that the rice can be cooked without having to drain left over water out (using the absorption method). Add salt and stir it all up so the flavours are evenly distributed.
  • While the rice is cooking, boil the eggs in their shells. Set the cooked rice and the hard boiled eggs to one side.
  • Return to the cooked chicken. Drain off the liquid discarding the bay leaves and cloves. Shred up the chicken into bite-sized chunks.
  • Fluff up the cooked rice and chorizo and put 1/3 of it into the bottom of a large oven safe casserole dish.
  • Then add 1/3 of the cooked chicken onto of the rice. Repeat the layering of the rice then chicken until you’ve used it all up.
  • Peel the eggs and cut in half  (length ways) and push them into the top of the rice so they are sunken in.
  • Scatter the grated cheese on top of the whole pot of rice and put into the oven to bake. I baked it at 200 degrees C for 15 minutes. The aim is to crisp up the rice at the top and melt the cheese, not to heat everything up as the rice should still be quite hot.
Yummy cheese ready to be melted and crispen up

Yummy cheese ready to be melted and crispen up


This dish is a meal in itself, so serve in big bowls for lunch or as part of dinner with some other tasty morsels to pick at. I served this dish in the middle of the table with chicken pot-stickers and the braised duck with pickled cucumber and spring onion pancakes so there was a variety of things to nibble on.

As the chicken is braised over a long time it soaks up the flavours from the loves and bay leaves. The rice takes on the paprika from the chorizo too so this dish is packed with mouth-watering flavour! It seems like a bit of a complicated dish to make but it’s actually quite simple, you just need to be organised with your time! I’ve seen other versions of this recipe that uses duck as the main source of protein, will try this next time…

Macau Baked Chorizo and Chicken Rice

Cheesy, crispy hug in a bowl goodness!

Chicken Tikka Potstickers: the dumplings with a twist!

I have previously posted about potstickers/dumplings/gyozas before but for this recipe I have used the basic idea of the potsticker and given it a South Asian twist!

Chicken Tikka Potstickers

Chicken Tikka Potstickers

Chinese potstickers are traditionally served with a milder flavours in comparison to spicy South Asian cooking (as with a lot of Chinese cooking the flavours are simple and subtle) and the dumplings served with a simple dipping sauce, usually based on soy sauce and vinegar. Taking inspiration from the was South Asian samosas are served, I decided to add a little spiciness to the filling of the potstickers as well as serve them with a couple of punchier dips!

Recipe

For the dumplings:

  • 1 packet of pre-made dumpling pastry (I’m too lazy to make my own this time!)
  • 4 skinned and boneless chicken thighs (chopped very finely or minced)
  • 2 tbs Tikka Masala curry paste (or make your own spice marinade)
  • 1 medium cooked potato, crushed (I used left over roasted potatoes)
  • 2 chopped spring onions (can use leeks or onions)
  • Salt (to taste)
  • 2 tsp oil (for frying)
  • Boiled water (for steaming)
Potsticker wrapping

Potsticker wrapping

For the Chilli, Mint and Yoghurt Dip

  • 1 cup of natural yoghurt
  • 2 tbs green chilli sauce (I used bottled)
  • 2 tbs mint sauce (I used bottled but you can use fresh mint too!)
  • Salt (to taste)
Mint and Chilli Yoghurt

Mint and Chilli Yoghurt

For the Spiced Tomato Dip

  • 5 ripe tomatoes, chopped
  • 1 small red onion, chopped
  • 1 tbs oil (for frying)
  • Spices (I used 1 tsp each of mustard seeds, fennel seeds, cumin seeds and dried chilli flakes)
  • Curry leaves (a few)
  • 2 tbs tomato paste
  • 2 tsp vinegar (I used apple cider vinegar)
  • 0.5 tsp sugar
  • Salt (to taste)
Spiced Tomato Chutney

Spiced Tomato Chutney

Method

For the dumplings:

  • Mix the chicken with the Tikka paste and allow to marinade for a few hours of over night.
  • Mix the raw chicken with crushed potatoes and leeks and add a little salt.
  • Wrap the dumplings using about 2 tsp of filling per dumpling. Line a couple of plates or baking trays with ling film to put the dumplings on to avoid them sticking the plate. make sure the dumplings aren’t touching as they will stuck together. You can also stick them straight into the freezer on the tray/plate then stick them into freezer bags for later use.
  • In a heavy based sauce pan that has a lid or wok, add the oil and warm up. Add the dumplings into the pan, fairly close together, completely filling the pan but with a little space between each dumpling as they expand during cooking. Fry for a few minutes until the bottom of the dumplings have browned a little.
  • Now it is time to cook the filling, so add some water to the pan (about 1 cup), cover with the lid and steam for 5-10 minutes on a low heat (until the filling is cooked through). If there is still water left in the pan, increase the heat to evaporate the remaining water and crisp up the bottoms.
  • The dumplings will stick to the pan (hence the name ‘potstickers’ but with a little care and the help of a fish slice spatula, you can easily lift them out!)
  • If cooking from frozen, no need to de-frost them. Just stick them straight in the pan and steam for an extra 5 minutes.
Potstickers- chicken tikka

Potstickers- Ready for the freezer

For the Chilli, Mint and Yoghurt Dip:

  • Mix everything together and add salt to taste, simple!

For the Spiced Tomato Dip:

  • Dry roast the whole spices and curry leaves in a saucepan
  • Add oil and cook the onions until softened
  • Add the chopped tomatoes and tomato paste, stir and then cook for a few minutes until they are soft and most of the juices from the tomatoes has gone
  • Add the salt, sugar and vinegar and cook for a couple more minutes
  • Taste and allow to cool
Chicken Tikka Potstickers

Chicken Tikka Potstickers

I made a batch of these and froze them for future meals when there is no time to cook or I’m too tired. Today was that day!

The filling was nicely spiced and very much reminiscent of the taste of chicken samosas but a lot lighter since they aren’t deep fried. The potatoes in the filling help to keep it all quite dry so there is less risk of the dumplings bursting, however it also means that dips/chutneys are very much necessary!

The spiced tomato chutney worked very nicely, as the vinegar added a sharpness that lifts all the flavours and brings back in the freshness that you would normally get from a traditional Chinese dipping sauce. Then the minty yoghurt cools everything down… So delicious! I ate at least 10 in one sitting! 🙂

Mum's Chinese Chicken and Potato Stew

Chicken and potato stew with fermented beancurd

Chicken and potato stew with fermented beancurd

This dish makes a regular appearance at the dinner table when I’m eating at my parent’s house. My mum taught me to cook it when I was a student so I could cook traditional Chinese foods instead of eating ready made microwave meals every day. It’s such a simple dish to make that I actually stuck to it and would make a big pot that would last a few meals. I don’t have the recipe written down anywhere, just have it stored in my head. I have tried to look for it online but only found versions of the same recipe, so I guess it is the kind of family dish that is slightly different depending on which part of the world you are in!

This Chinese Chicken and Potato Stew recipe is close to my mum’s recipe, but with a vital missing ingredient: fermented tofu. This is may be an unfamiliar ingredient to people who don’t usually cook this kind of Chinese food, so here’s the Wikipedia explanation. I have to admit that I had no idea how fermented tofu was actually made until I read this, so I have learned something new today! The fermented tofu gives the dish a unique flavour, it’s hard to describe… it is somehow more ‘savoury’ in taste. Sorry that’s the best I can do! For this dish I used the red variety and this resulted in a deeper colour. 

I don’t usually post recipes but since I can’t find an exact version of my mum’s then here goes:

Chicken and Potato Stew

  • 1 pack of chicken drumsticks and thighs (chopped into small pieces)
  • 4 medium sized potatoes (cut into quarters)
  • 2 cubes Fermented tofu (white or red will do)
  • 3 cloves of garlic (squashed with the side of the knife)
  • 1 tbls Oyster sauce
  • splash of both light and dark soy sauce
  • sprinkle of sugar (to balance the flavours)
  • sesame oil (a few drops to taste)

How to cook:

  1. Brown off the chicken pieces with the garlic
  2. Add all other ingredients aside from the potatoes and stir it up so the chicken is evenly coated
  3. Add potatoes and stir stir again
  4. Put a lid on then cook on a low heat until the chicken is done. Stir it up every ten minutes and add water if it looks too dry.

As I said, it’s an easy dish to prepare. The cooking time will depend on the size of your potatoes and chicken pieces, this time it took me around 25 minutes. 

Garnish with chopped up green onions to make it look pretty and add a different texture. Serve with plain steamed rice and balance with a fairly bland green vegetable dish, this chicken is very rich in flavour. You may think that serving potatoes with rice is a little strange but that’s how I had it growing up and it tastes delicious!

Chicken and potato stew with fermented beancurd

Chicken and potato stew with fermented beancurd

 Variations to this dish could include using pork belly instead of chicken or use deep fried beancurd/tofu for the protein to make it vegetarian! (Substituting the oyster mushrooms for vegetarian stir fry sauce)

Adding shitake mushrooms or wood ear mushrooms, carrots or radishes such as daiykon are also tasty alternatives!


Braised Chinese Chestnut Chicken

Wintery Chinese Stew: Braised chicken with chestnuts and shitake mushrooms

Traditional home cooked Chinese food is quite different to what your local Chinese take away or restaurant in the UK usually offers. Dinners at home are served ‘family style’ where there are several dishes in the middle of the table for everyone to pick at. There is usually one fish, one meat and a vegetable dish, all served with steamed jasmine rice. Though this can vary depending on the numbers of people eating and how much time you have to cook.

Braised chicken with chestnuts, and variations of it, is a family favourite. I’ve made it a couple of times for British friends as a way of introducing traditional Chinese home cooking and it’s always been well received! As it is a heavy dish full of strong flavours, it’s best to serve with simple greens and some kind of steamed fish. However since I cooked it for just two people at lunch, we just had it with plain steamed rice.

I took this recipe from the Every Grain of Rice cook book and rediscovered how much of a pleasure it is to cook from a book! No need to keep running over to my laptop to check ingredients or turning the screen saver off my phone when I’ve forgotten the next step…

I adapted the recipe slightly as I had no spring onions so used leeks instead. I used chicken leg quarters chopped up, and deep fried leeks in a little corn flour to add a final crispy finishing touch for texture and appearance sake.

I would recommend this Every Grain of Rice cook book to anyone who wants to learn some basic Chinese family recipes!

“Crispy chicken skin is the new bacon”

CIMG3045

There seems to be a new trend in the UK at the moment for ‘American diner’ style restaurants that make fancy cocktails to go with your over-priced burger. About 6 months ago I decided to try one of these restaurants after seeing rave reviews. I was most looking forward to their ‘Rooster Scratchings’!

As a Chinese person, I’m ashamed to say that I don’t eat red meat. That rules out about 50 percent of delicious Chinese cuisine and causes no end of headaches for my family and friends who invite me for meals. It’s not for any particular reason really. My mum tells me that I never used to eat much red meat when I was growing up, so I must have just developed a general disliking to it and now it is firmly embedded into my subconscious self.  I always say that I’m not a picky eater, but that’s not true really. My stomach turns at the thought of bacon and at the slight whiff of lamb, I’ll be heading off in the opposite direction!

Hence I miss out on the culinary delights of roast belly pork with the extra crunchy crackling and slow roasted ribs where the meat just falls off the bone… So as you can imagine, finding an alternative like ‘Rooster Scratchings’ caused me no end of excitement! However, I must have built up my expectations a little too much, as I found them quite greasy and salty. What a disappointment…

Fast forward half a year and whilst preparing a boring mid-week meal of roasted chicken thighs (with lots of spices to please my partner who insists that my cooking is somewhat ‘tasteless’). I was ripping off the chicken skins and it suddenly occurred to me that I could probably do something with them too… After all in this time of austerity, its a shame to waste anything!

A quick internet search later, I’ve found this: http://homecookinginmontana.blogspot.co.uk/2013/07/oven-fried-crispy-chicken-skin.html

As usual, I don’t really stick to recipes so to give extra flavour I’ve added mixed spices.  So the key to ensuring you get it really crispy and none greasy is to bake rather than fry. I reduced the cooking time down to about 25-30 minutes and didnt’ bother to sandwich the skins between two pans, they look nicer all bubbly! It’s a great addition and doesn’t take any extra time if you are making your dinner in the oven anyway. Imagine them crumbled over a lovely salad for extra crunch…

This is what it should look like

©homecookinginmontana.blogspot.co.uk

crispy chicken skin