No Bake Peanut Butter Cheesecake

Inspiration for this recipe came from Anna over at Anna’s Kitchen Table after she reposted this amazing recipe for ‘Peanut Butter Cup Brownie Bottom Cheesecake’. Peanut butter is one of my guilty pleasures in life and the photos of the finished cheesecake instantly made me giddy with the excitement of tasting it and my baking fingers began to twitch!

When the occasion finally came along to give me an excuse to make this indulgent cake, I instantly bought a jar of peanut butter and got started! However on reading the recipe I found that I didn’t actually have enough time to make the original recipe since it is a baked cheesecake and requires at least 4 hours in the fridge! So I decided to make a ‘no bake’ version which is much faster and easier! 🙂

*WARNING* this Cheesecake contains a whole jar of peanut butter! 😀

Image


So the recipe I used wasn’t really written down anywhere, I tried to use two recipes and merge them together. However I have to admit that the ‘brownie’ bottom didn’t quite work out and I ended up with more of a ‘cake’ base instead…


Ingredients for the base

  • 1/4 jar of smooth peanut butter
  • 100g melted milk chocolate
  • 100g light brown sugar
  • 1 egg
  • 100g flour (this is where I went wrong as this is far too much flour!)
  • two handfuls of salted peanuts

Method

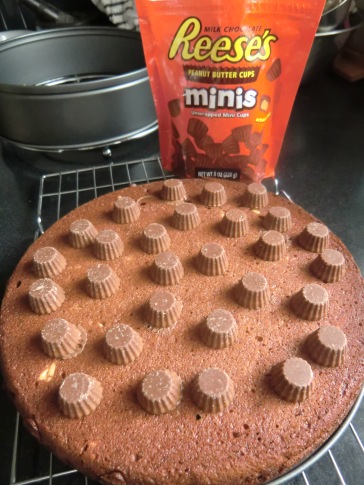
  • Mix all ingredients together until just combined and bake in a spring form cake tin until just cooked- I think I baked it at 180 degrees C for 10 minutes- but this was too long…


Image

Cakey Peanuty Base

Once the base is taken out of the oven, add mini Reese’s Peanut Butter Cups on top so they start to melt slightly…

Image


Ingredients for the filling

  • 2 tubs of full fat cream cheese
  • 3/4 tub of smooth peanut butter
  • 150ml milk
  • 100g icing sugar

Method

  • Put everything in a bowl and whisk it all together until blended well. Taste to see if it needs more sugar.
  • Once the base is cooled, spread the filling onto the base and level off
Image

Peanut Butter Cream Cheese Filling


The topping!

I used chocolate ganache, extra peanut butter cups and Maltesers…Go wild with your imagination! 🙂


Image


Apologies for another poor quality photo of the finished product! I served it this decadent dessert after a Mexican Night with friends.

The base of the cheesecake was slightly too thick, but not too heavy. The filling was very creamy and the peanut butter came through extremely well! I think I could have been a little more adventurous with the toppings, however I was bleeding quite heavily from cutting my thumb whilst trying to chop a Malteser in half, so finished off quickly so I could!

Overall, the cheesecake was very tasty if you love peanut butter, but I think it’s best reserved for special occasions! 🙂

I’ll be trying out Anna’s recipe next time…

Mexican Night: Guacamole, Refried Beans, Salsa, Nachos and Buffalo Wings!

Mexican Night

Mexican Night: Nachos, Guacamole, and Salsa

April 2014 has flown by with little blogging activity from me. Apologies for my absence, however it was my birthday at the beginning of the month and the Easter bank holiday came and went, all in all it has been incredibly busy but so much fun! 🙂

I’ve not cooking a huge amount, and when I have I’ve been trying to take photos for the blog but not always with great success! So this meal was prepared for a night in with some friends to go with a few drinks…

One of the many birthday treats I had was to go to a ‘Latin American’ style restaurant where we started off with nachos and spicy chicken wings. This was my inspiration for this collection of nibbles, full of flavour and easy to eat with your fingers over a long evening of chatter with good company!

Let’s start with the Guacamole! I’ve never made it before, as it is only recently that I’ve eaten avocado. I’ve been informed that this was the ‘best guacamole ever tasted’, so a pretty good recipe!

http://www.foodnetwork.com/recipes/alton-brown/guacamole-recipe.html

Guacamole

This recipe can be found here. I think the secret ingredient is the ground cumin which gives it a nice depth of flavour. Make it ahead so the flavours have time to melt into each other!

Then there is the Salsa!

Salsa

Salsa

This salsa recipe calls for one jalapeño chilli which I didn’t have but I only had pickled jalapeños so substituted that instead. My partner reliably informs me that this is similar to Afghan ‘Salata’. Another recipes that transcends cultures!

Cheesy Nachos

Cheesy Nachos

This is a fairly straight forward recipe for grilled nachos; tortilla chips topped with sour cream, jalapeños, refried beans and plenty of cheese!

Now for the chicken wings. I went with this recipe for Baked Buffalo Wings, as it was pretty straightforward and promised a crispy spiced finish.

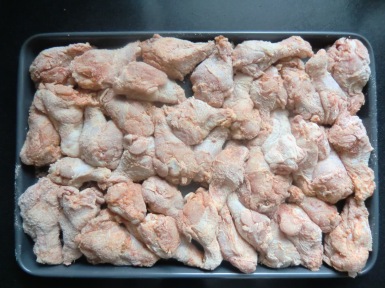
Buffalo Wings Preparation

Buffalo Wings Preparation

The key to this recipe is leaving the coated wings in the fridge for at least one hour to dry out. I roasted them in two separate trays to ensure they weren’t over crowded.

Buffalo Wings

Buffalo Wings

Before baking, each piece is dunked into a an emulsion of butter and chilli sauce. Needless to say, they were delicious! Apologies for the terrible photo! 😦


Cauliflower Broccoli Cheese Soup

Cream of Broccoli and Cauliflower Soup

Cauliflower Broccoli Cheese Soup

Cauliflower Broccoli Cheese Soup

When making Cauliflower and Broccoli Cheese Bake as a side dish for my ‘Toad in the Hole’ I looked at the big pile of left over cauliflower leaves, tough broccoli stalks and thought to myself- “what a waste, surely these can be used and not binned?!”

I don’t usually buy or eat cauliflower, so wasn’t sure if the leaves were edible. A quick internet search later I found that they are an excellent source of Vitamin C! Who knew?… So there are several idea for recipes, one being making cauliflower leaf ‘crisps’ similar to the fashionable ‘kale crisps’, another is to use it like cabbage leaves. I decided to make a soup from the left overs as it is currently grey and miserable outside, so comfort food is necessary!

Cauliflower Leaves and Broccoli Stems

Cauliflower Leaves and Broccoli Stems

This soup is made of left overs, from the vegetables to the cream! I often have left over vegetables in the fridge that end up chopped, bagged, then frozen so it doesn’t go to waste. Currently in the fridge I have celery (another veg I don’t usually cook or eat so had plenty left from a previous recipe) and peeled cloves of garlic. The garlic was on offer for £1 for about 8 from market but we obviously couldn’t get through them fast enough so I spent an hour peeling them and stored them whole in a tub in the freezer. They are great for using in curries and stews! The cream to enrich the soup was left over from making Caramel Profiteroles for Mother’s Day as I had bought 2 tubs of cream, just in case, but luckily didn’t need the second one…

Cauliflower Broccoli Soup

Cauliflower Broccoli Soup

So here’s the recipe, no proper measurements I’m afraid as I was making it up as I went along…

Ingredients

  • Cauliflower leaves and stem from one head of cauliflower- roughly chopped
  • Broccoli stems and any other left overs bits
  • Handful of chopped celery
  • 3 cloves of garlic
  • Cream as much as you like
  • Cheese whichever you have in the fridge
  • Salt and pepper to taste

Method

  • In a saucepan sauté all the vegetables together for about 10 minutes until tender
  • Blitz in a blender until smooth
  • Return soup into the saucepan. Add cheese, cream and salt and pepper to taste

I decided to serve with a sprinkling of cayenne pepper and a pumpkin seeds to add crunch. Not bad for using up vegetables that would have ended up in the bin or compost heap!

Cauliflower Broccoli Cheese Soup

Cauliflower Broccoli Cheese Soup


‘Toad In The Hole’ with onion gravy

Toad In The Hole

Toad In The Hole

‘Toad In The Hole’ is a traditionally British dish of sausages bakes in ‘Yorkshire Pudding’ batter. Coming from a Chinese family in England, this dish is not something I actually grew up eating but I do love a good Yorkshire pudding! The origins of the name of this recipe is slightly unclear, check out what Wikipedia has to say…

I cooked this meal during a blustery Saturday. It was that kind of day when the weather gets you a little down, and all you need is some comforting food to keep you warm inside! I’m not a lover of traditional pork sausages, so I used both pork and turkey sausages in the recipe so that everyone could have a little something they’d like. As it turned out, the turkey sausages were preferred, so I’ll be getting them again! Yum!

Toad In The Hole

Toad In The Hole with Onion Gravy

I served the Toad In The Hole with an onion gravy and went for Cauliflower with Broccoli Cheese to go on the side.

So as you can see from the photos, the meal was very heavy as the Yorkshire Pudding was very dense! Since this is the first time I’ve made this dish, and the last time I had it was probably when I was in school, I’m not sure if this has turned out right?  Where the Yorkshire Pudding was quite thin, it was lovely and crispy and light… maybe too much batter? Any experts out there to give a little advice? Please! 🙂


Cauliflower and Broccoli Cheese Bake

Cauliflower Broccoli Cheese Bake

Cauliflower Broccoli Cheese Bake

This Cauliflower and Broccoli Cheese recipe was made to go along with the ‘Toad in the Hole’ and onion gravy, making an all round comfort eating dinner for a dreary British day! I’m not particularly good at cooking traditional ‘British’ foods, or a lover of them as I like lots of spice! However Good ingredients cooked well will always shine through, so I grabbed a couple of heads of broccoli and a cauliflower and got to work… I was attracted to this recipe as the broccoli is actually blended into the creamy cheese sauce, giving it a lovely vibrant colour and extra flavour. I also liked the idea of giving it a crispy top by using bread crumbs and almonds. (I decided to skip the breadcrumbs this time as the meal contained a lot of carbohydrate already!)

Cauliflower Broccoli Cheese

Cauliflower Broccoli Cheese

The cheese sauce has a lovely green colour as there is a whole head of broccoli blitzed into it. The toasted almonds on top added a nice nutty taste and some much needed texture to the dish too! 🙂

I’m not a big fan of cauliflower as I find it quite watery and tasteless as a vegetable. However I think it works as a carrier of flavours, and have recently seen some great  recipes for cauliflower curries. As you can see, I’m still leaning towards foods with lots of spice! 😉

Caramel Profiteroles: A stab at French patisserie

Caramel Profiteroles

Caramel Profiteroles: My attempt at recreating 


On a recent break to Nice in the south of France, I had the most delicious profiterole dessert from a local patisserie that was open until 10pm! Imagine if such an amazing thing existed in my home town?! I’d never have an emergency dessert baking moment again… Oh to dream!

So while in France, it’s obligatory to eat as much from the local patisseries as possible,from breakfast croissants to afternoon treats after a long day of sightseeing. Well that’s what I think anyway!

Caramel Profiteroles from Nice, France

This is a photo of the Caramel Profiteroles I had in Nice, France- doesn’t it look so perfect and delicious?

So as you can see this dessert was amazing and I haven’t seen it available anywhere since. The choux pastry was crisp and the creme patissiere not too sweet. The burnt caramel offset the cream perfectly and I was so sad to eat the last mouthful! Unfortunately I didn’t get a chance to go back and get another one as we left the next morning. So I have recreated it in my own kitchen as part of the Mother’s Day lunch for my family!

Caramel Profiteroles

Caramel Profiteroles


I have to admit that I don’t have a recipe to share as I kind of made it up as I went along, starting from a basic choux pastry mix and filling the profiteroles with creme patissiere. But here is a similar one if you want to give it a go yourself!

When working with the caramel, be very careful as I managed to burn my middle finger and a thumb on the burning hot sugar! Blisters alert! 😦

With only a photo of the original dessert on my phone to go by, I made a stab at reconstructing the dessert to look the same. The base is a disk of choux pastry that I had to squash down as it puffed up then I used some of the caramel to ‘glue’ three creme patissiere filled profiteroles onto the base. I decided that easiest way to do the profiteroles was to fill them first that dip them into the caramel, hence the burning of fingers as they were heavy and kept falling in! I topped the freshly whipped cream with some flaked almonds that I toasted then ground.

Caramel Profiteroles

Caramel Profiteroles- home made


I think I managed to capture the general essence of the dessert, not as neat I wanted but it was OK for a first attempt. Unfortunately I was pressed for time so was unable to take step-by-step photos. Maybe I’ll attempt this again and take photos next time! 🙂


Roasted Vegetable Terrine

Roasted Vegetable Terrine

Roasted Vegetable Terrine

Roasted Vegetable Terrine

I’ve never attempted a ‘terrine’ before. I like the look of all the layers of colourful vegetables and have seen it being done on cookery programmes so decided to give it a whirl as part of a Mother’s Day lunch…

I loosely based it on this recipe  for Roasted Vegetable and Goats Cheese Terrine but my mum isn’t keen on goats cheese so I went for mozzarella instead. I also went to town when buying vegetables so used ALOT of different ones. In hindsight it is probably better to stick to a few vegetables that you can repeat the layers with, less time consuming to prepare and allowing the flavours to shine through individually too…

I pretty much spent three hours individually roasting the slices of vegetables and pan frying some. I seasoned with salt and pepper as I went along and added extra flavour by using a layer of sun-dried tomato paste in the middle. You can use whatever takes your fancy! 🙂

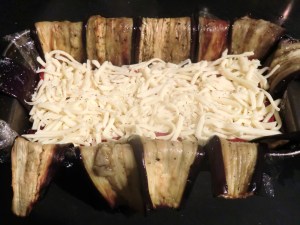
So this is how it was constructed:

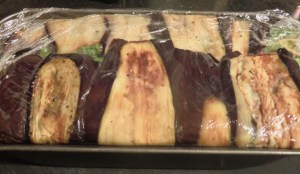
Vegetable Terrine- Aubergine Layer

Vegetable Terrine- Aubergine Layer

Vegetable Terrine- Sweet Potato Layer

Vegetable Terrine- Sweet Potato Layer

Vegetable Terrine- Sweet Potato Layer

Vegetable Terrine- Sweet Potato Layer

Vegetable Terrine- Red Pepper Layer

Vegetable Terrine- Red Pepper Layer

Vegetable Terrine- Mozzarella Layer

Vegetable Terrine- Mozzarella Layer

Vegetable Terrine- Sundried Tomato Paste Layer

Vegetable Terrine- Sun-dried Tomato Paste Layer

Vegetable Terrine- Portabello Mushroom Layer

Vegetable Terrine- Portabello Mushroom Layer

Vegetable Terrine- Courgette Layer

Vegetable Terrine- Courgette Layer

Vegetable Terrine- Artichoke Layer

Vegetable Terrine- Artichoke Layer

Vegetable Terrine-  Asparagus Layer

Vegetable Terrine- Asparagus Layer

Vegetable Terrine-  Final layer!

Vegetable Terrine- Final layer!

Vegetable Terrine-  Ready for the fridge

Vegetable Terrine- Ready for the fridge


The terrine needs to be made ahead so that it can be kept in the fridge for at least 8 hours to allow the flavours to infuse. I put a heavy bottle on top to squash the layers down so that the terrine holds it shape on turning it out.

Vegetable Terrine - The result!

Vegetable Terrine – The result!

I served the terrine with rosemary and garlic roasted chicken, garlic hassle-back potatoes, red cabbage coleslaw and ‘no knead’ oatmeal bread- all home made!

Roasted Vegetable Terrine, Roast Chicken, Hassel-back potatoes, Red cabbage coleslaw

Roasted Vegetable Terrine, Roast Chicken, Hassel-back potatoes, Red cabbage coleslaw

The different colours and layers looked great but did fall apart a little on cutting. The flavours worked well together, but I’d use more sun-dried tomato paste and cheese next time and fewer different types of vegetables… worth the effort for a special occasion! 😀