Bolani and Raita

Baked Bolani: A healthier cheats recipe using dumpling wrappers

Bolani and Raita

Bolani and Raita

I have previously posted about ‘Aushak and Bolani‘- what I know to be traditional Afghan dishes. Aushak are a vegetable filled dumpling, usually using green onions or leeks, and Bolani are a stuffed flat bread (usually vegetarian too).

These dishes are a little time consuming to make, especially if you are making the dough yourself, so I cheat by buying frozen dumpling wrappers from the Chinese supermarket! There are local Afghan restaurants that sell these dishes but they are quite expensive, for what is basically vegetables wrapped in dough! So I usually make them at home, having a stock in the freezer for when the taste buds are calling…

Baked  Bolani:

Bolani Wrapping

Bolani Wrapping- seal with some water around the edges. The filling is cooked mashed potato, green onions and spinach with chilli flakes and ground spices


Bolani

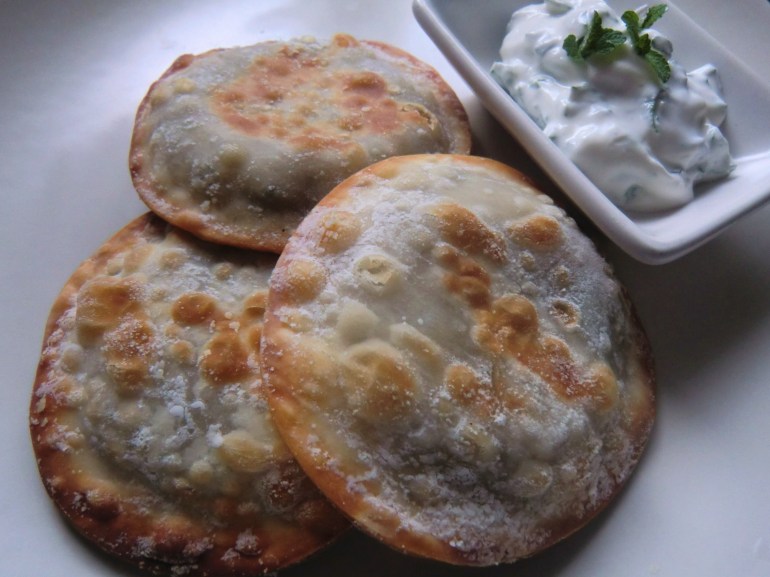
Bolani- finished and ready to cook straight away or freeze for a later date


Bolani

Bolani: sprayed with vegetable oil and baked in a hot oven for 10 minutes on each side


Bolani are more traditionally pan fried in oil and soak up quite a lot of oil in the process. By spritzing the Bolani on both sides with a spray oil, it is much healthier and the dough gets nice and crunchy around the edges. By using these dumpling wrappers, they are also ideal for a small starter or snacks for guests. Less messy that larger flat breads too… Serve with whatever chutney or sauce you fancy!


Aushak:

Aushak Wrapping

Aushak Wrapping- Filling of cooked spinach and leeks with various ground spices and sealing the edges with water


Aushak

Aushak- lined up ready for the freezer


Aushak can be served either steamed or boiled, with a lentil or ground meat based sauce. I didn’t get a picture of the cooked result this time though…


Ful Medammes

Ful Medammes: Stewed Egyptian Fava Beans

Ful Medammes

Ful Medammes with Poached Egg and Home Made Bread

Ful Medammes/Mudammas/Medames: Stewed Fava Beans

I first discovered this dish in a Yemeni restaurant in Manchester’s famous ‘Curry Mile‘, one of my favourite places to go for a delicious meal out when cooking is too much like hard work! I’ve since eaten it on holiday in Egypt, it was so delicious that I had it for breakfast every day!

According to Wikipedia Ful Medammes is: ‘an Egyptian/Sudanese dish of cooked and mashed fava beans served with vegetable oilcumin and optionally with chopped parsley,oniongarlic, and lemon juice. A staple meal in Egypt and Sudan, it is popular in the cuisines of the LevantSomaliaDjibouti,EritreaEthiopia and Saudi Arabia’.

Today I made a second attempt at a ‘no knead bread’ recipe and made some Ful Medammes and poached egg to go with it.

Ful Medammes with Poached Egg

Ful Medammes with Poached Egg

Ingredients:

  • I can of Ful Medames Beans
  • 1 tbs tomato puree (use a couple of fresh tomatoes if you have them)
  • 1tsp ground cumin
  • half onion, finely chopped
  • clove of garlic, finely chopped
  • salt to taste
  • 1tbs olive oil

Method:

  • Saute onions and garlic with the oil in a small saucepan
  • Add ground cumin, salt, and tomato puree/tomatoes, cooking for a few minutes to form a paste
  • Add the tinned fava beans and a splash of water. Stew on a low heat for 10 minutes, stirring every so often. Add water if it starts to stick.
  • At  this point it’s cooked. The beans can be served whole or mashed into a smooth paste. (I like mine mashed!) Add chopped fresh parsley, if you have it, to add some freshness!
  • Serve hot with boiled/poached/fried eggs and toasted bread.
Ful Medammes and Poached Egg

Ful Medammes and Poached Egg

This dish is almost like a middle-eastern version of eggs and baked beans! There is loads of flavour and left overs can be served cold as a dip with vegetables and flat bread (like a hummus!). It’s a perfect make-ahead dinner party starter as spice can be added to suit individual tastes.

Ful Medammes

Ful Medammes


No Knead Loaf

No Knead Bread: Attempt Number 2

No Knead Loaf

No Knead Loaf

After the last disappointing attempt at the No Knead Loaf I decided that I would give it another go but this time taking the advice of SurpriseSaffron and baking two smaller loaves to ensure the bread is properly cooked all the way through. And guess what?! It worked! 😀

No Knead Loaves

No Knead Loaves

I also adjusted the ingredients in the recipe a little and left the dough to proof for longer, et voile! A couple of perfectly baked loaves that were super tasty and evenly textured all the way through…

No Knead Bread

No Knead Bread


New recipe:

  • 360g strong wholemeal flour
  • 140g strong white flour
  • 375ml warm water
  • 1tsp dried instant ‘hand baking’ yeast
  • 1tsp honey
  • 1.5tsp sea salt

New Method:

  • Mix everything up and leave in a cling film covered bowl for between 16 and 18 hours (In the UK, our clocks went forward by an hour today, so technically I left by dough to proof for 17 hours…)
  • Pre-heat oven to 220 degrees C, and knock back the dough
  • Halve the dough and shape into two loaves and leave to proof for another 10-15 minutes as the oven gets hot
  • Spray water onto the top of the loaves and bake for 40-45 minutes (or until done). Allow to cool before cutting otherwise the dough gets mushy!
No Knead Loaf

No Knead Loaf

I’m glad I decided to try ‘no knead bread’ again. It takes very little effort and the results are just as good as the traditional twice kneaded, twice proofed home made bread. I’d go as far as to say it’s even tastier than bread made in the bread machine! I think the taste comes from the long fermentation of the yeast…


Raspberry and Cumin ‘Cheesecake’ Tarts: an experimental emergency dessert!

image

Tonight I desperately needed a dessert after dinner and came up with this little experiment…

image

The pastry tart shells were left over from a savoury vegetable tart I’d made ages ago, and had frozen left over tart shells. These were reheated in the oven to crispen up and revive.

I whipped up the soft cheese with some icing sugar and a little vanilla paste.

Then the raspberries were cooked up with some icing sugar into a sweet and sharp syrupy sauce.

All these ingredients were then made up into little tarts within 10 minutes of being taken out of the fridge and freezer!

The cumin in the pastry was very strong and over powered the raspberry flavour. The taste was nice but a little too much on the savoury side I think!

Overall a nice little experiment but I probably wouldn’t have it again 🙂

image

No Knead Seeded Wholemeal Loaf

No Knead Bread

No Knead Bread

What happens when you forget to program the bread machine? Another experiment! 🙂 So, yes I forgot to turn on the bread machine! So I returned home in the late evening to a soggy mush of flour, water and yeast with not enough time to set the machine to bake for three and a half hours. Not wanting to waste good ingredients, I decided to try out the ‘no knead bread’ theory… I’m fairly inexperienced in bread making. Mainly because I don’t have the patience for all the kneading and waiting around for the proving. It is great if you have a lot of time in the house that day and you’re doing chores or you can give the dough a quick knead in between writing blog posts. However I don’t have this situation come up very often so the bread machine has been a happy compromise! Until I forget to turn it on… 😦 So all I did with this bread was to mix all the ingredients into a rough ball of dough, then left in a cling film covered bowl over night (around 10 hours in total) then punched it down and formed into a ball to bake in the oven.

No Knead Bread

No Knead Bread

Ingredients

  • 360g strong wholemeal flour
  • 140g strong white flour
  • 1.5 tsp bread machine yeast
  • 375 ml water
  • 1 tbs olive oil
  • 1 tbs agave syrup
  • 1 tsp sea salt
  • poppy seeds
  • pumpkin seeds
No Knead Bread

No Knead Bread

After baking in a hot oven for 40 minutes, I took the bread out. I did the tapping test and it sounded done. However upon cutting into the middle of the loaf, I found that it was under-baked so I stuck it back in the oven. This didn’t really help much as it was still quite mushy in the middle and the crust was just getting harder and harder! So my fellow bloggers, what has gone wrong?! The taste of the bread wasn’t great. it was bland and the poppy seeds didn’t really come through. The texture was OK (where it was cooked!), as you can see from the photos the dough was quite cakey and the air pockets are very small but the crumb was nice and crisp.

No Knead Bread

No Knead Bread

The things I think could have gone wrong are:

  1. I’ve used the wrong type of yeast (I have two types, one for bread machines and one for hand kneading- both are dried fast action)
  2. The oven wasn’t hot enough
  3. Wrong measurements for the ingredients required for ‘no knead’ bread.

I reckon that if I can master the art of no knead bread, then I can make a bit more space on the kitchen work tops by getting rid of the huge bread machine and maybe getting an ice-cream maker instead?! 😉


Update on 30 March 2014:

Not one to be beaten, I have attempted to bake this no knead bread again! Taking tips from SurpriseSaffron and making some slight adjustments to the ingredients, I have successfully baked a decent ‘No Knead’ Loaf!

No Knead Loaf

No Knead Loaf


versatile blogger award

Versatile Blogger Award

versatile blogger award

versatile blogger award

Another day, another award! Check me out! Three awards in 2 weeks… that’s more awards than I’ve had in a life time! This Versatile Blogger Award comes from the lovely Cheergerm @ The Cheergerm & The Silly Yak. Many thanks for the nomination! 🙂

So here are the rules:

  •  Thank the person who gave you this award.
  •  Include a link to their blog.
  •  Nominate 15 bloggers for the Versatile Blogger Award
  •  Finally, tell the person who nominated you 7 things about yourself
versatile blogger award

versatile blogger award

To pass on this award, I’d like to nominate:

  1. theglutenfreetreadmill.com
  2. whatjessicabakednext.wordpress.com/
  3. rantingchef.com
  4. stefangourmet.com
  5. Anna’s Kitchen Table
  6. chefindisguise.com
  7. lickandspoon.wordpress.co
  8. forayintofoodstorage.com
  9. homemadewithmess.wordpress.com
  10. bigjewonadiet.com
  11. shivaaydelights.wordpress.com
  12. lewisandkim.com
  13. easyitaliancuisine.com
  14. eatsleepbakerepeat.wordpress.com
  15. myfoodtapestry.wordpress.com

I’ve nominated these lovely people because their blogs are fun and I keep me entertained for hours on end! I’m regularly running late as my quick morning catch up on their blogs turns into an extra half hour in bed! No more snoozing the alarm for me, it’s your blogs that help me wake up! 🙂

So here are my 7 random facts:

  1. When I was a kid I had three goldfish, they were named after my favourite foods: Pizza and Popcorn. Then I ran out of foods, so I just called one FishFish!
  2. For the last two weeks I have had a piece, or two, of cake EVERY day. Then I wonder why I put on weight… 😦
  3. My favourite colour is yellow, but I tell people it’s blue. What does that say about me?
  4. I have little patience, so would make a terrible teacher…
  5. I have never broken a single bone in my body, except a manicurist once told me that it’s likely I’d broken my left pinky finger as a child as it’s slightly twisted. Does that count?
  6. I love holidays in sunny far-away lands and dream of getting out of dreary England for the rest of my life…
  7. I don’t have pets, they are unpredictable and require commitment. I’m quite non-committal with most things in life, if I can help it…

So that’s me! I’m looking forward to hearing back from my nominations! Please check them out, they are amazing and inspiring people! 🙂

Sunshine Award

Sunshine Award

Sunshine Award

Sunshine Award

How happy does this picture make you feel? I’m looking forward to seeing clear blue skies and flowers in the summer time again! In the mean time I’m going to keep staring at my lovely Sunshine Award! 🙂

Not only was I lucky enough to be nominated for this award by Dimple at Shivaay Delights, but a week later Laura at The Veggy Side of Me also nominated me! (As you can see I’m pretty far behind on my posts.)

Please go and check out Laura and Dimple’s blogs, they provide constant inspiration for my usually boring cooking habits! Thanks ladies! 🙂

So when receiving this award, here are the rules on what happens next:

1. Include the Sunshine Award icon in your post and/or on your blog
2. Link to the blogger who nominated you
3. Answer 10 questions about yourself
4. Nominate 10 other bloggers to receive the award
5. Link to your nominees and let them know you nominated them
6. Create 10 questions for your nominees to answer

The 10 questions I have to answer are here:

  1. Why did you start blogging? To start sharing my passion for baking and cooking with people who want to listen! 😉
  2. Sweet or Savoury? Sweet! Then a bit of savoury so I can move back to the sweet again… That’s why afternoon tea is so amazing!
  3. If you were to go on a reality TV programme, what would it be and why? I’m very camera shy, I’d probably accidentally  end up in front of a camera rather than volunteering to be in the programme!
  4. What was the last thing you Googled? ‘Sri Lanka Visa’- because I’ve booked flights to go there in September! It’s so exciting and I can’t wait! 🙂
  5. Night in or Night out? Night in, unless the night out only involves going to a lovely restaurant. I’m no longer interested in bars and clubs, I prefer quiet spaces with fewer people… Most people would say I’m quite dull! LOL!
  6. What has been your favourite blog post to write? Most definitely the Coriander Paneer and Jeera Rice post! It was a post about my attempts to try out fellow bloggers recipes, so not even my own creations but it got a really positive response! It confirmed to my mind that blogging is about the sharing within the community and is an example of how the blogging community loves to show support for one another. One of the recipes was actually Dimple’s! 🙂
  7. What is the one thing you never leave home without? My wallet. I feel very insecure when I don’t have some form of money with me! It can be a few coins or my debit card. You never know what will happen!
  8. Where would you most like to travel to? Well aside from Sri Lanka in September, I would love to do a 6 month tour of South Asia. I love the flavours of the foods from that side of the world, and I especially like to try Asian street foods! (Yes, I plan my holidays around food too!)
  9. If you could have a superpower, what would it be? I’d like to be able to teleport to any place I’d like to go. This would both be handy in every day life (I’m sick of commuting to work and travelling on public transport!)  as well as helping with my Asian travel adventures. Imagine if I could just teleport around the world? I wouldn’t have to do my travels in one trip, just do weekends away! Oh to dream…
  10. What can we expect to find from your blog in the future? I’m currently starting my kitchen garden for this year. I’ve been trying to grow my own fruit and veg for the last few years and have been fairly successful in growing cucumbers, beans and courgettes. However the cold weather in Northern England means that tomatoes and aubergines have yet to be accomplished! I’d like to use my home grown vegetables in some of my blog posts… please cross your fingers for a decent British summer this year! 🙂 
Sunshine Award

Sunshine Award

So that’s all about me… now the ten people I nominate are…

  1. Elaine @ Foodbod 
  2. Melissa @ The Glen House
  3. Sadia @ Savoury and Sweet Food
  4. Veronica @ Short and Sweet
  5. Tammela @ Wherever I am, you are there also
  6. Vivien @ One Stove
  7. Ada @ More Food, Please
  8. Ahmed @ That Photo Thing
  9. Laura @ La Petite Paniere
  10. Sonal @ Simply Vegetarian 777

Now these virtual friends of mine have been nominated because they bring sunshine to my life! Through their own blogs I get inspiration, through their words I get encouragement, and through their praise I feel pride. Please check out their blogs and see what your missing out on!

So guys, if you are willing to accept your award I’d be happy if you would answer these questions:

  1. What do you look forward to most when you first wake up?
  2. Are you a ‘night’ or a ‘day’ person?
  3. What is your dream job, and why?
  4. What would you like to see on my blog in future?
  5. What was the last dream remember having?
  6. Flowers or chocolates?
  7. What other hobbies do you have aside from blogging?
  8. When was the last time you did a handwritten letter, who was it to?
  9. What cheers you up on a dreary day?
  10. “A picture paints a thousand words”- post a picture that you like and explain why.

I hope you find these questions thought provoking, if not at least a little fun to answer!

Maple Syrup and Pumpkin Seed Cookies

Maple Syrup And Pumpkin Seed Cookies

Maple Syrup  and Pumpkin Seed Cookies

Maple Syrup and Pumpkin Seed Cookies

Believe it or not these cookies started as ‘oatmeal biscuits’! I’ve not been very organised in the kitchen recently, starting to bake or cook a recipe and then realising half way through that I don’t have all the ingredients I need!

So this it how the story begins… I got the idea in my head that I wanted to make some wholesome biscuits, no doubt because of all the lovely ones that Dimple over at Shivaay Delights has been posting recently! You’re such a bad influence young lady! 😉

So upon realising I had no golden syrup required for the recipe, I found some maple syrup and agave syrup so bunged that into the mixing bowl instead. So that’s a fairly non-recipe destroying  substitute right? Oh, but there is more… I then went to grab the bag of oats and found there was none! How unprepared can a cook be?!

Being unwilling to go out to the shops to buy the oats (it was rainy and miserable outside) I decided to press on ahead and make the biscuits using only self raising flour, but throwing in some mixed seeds and pumpkin seeds that I found in the baking cupboard.

Maple Syrup  and Pumpkin Seed Cookies

Maple Syrup and Pumpkin Seed Cookies

After 15 minutes in a hot oven, I ended up with Maple Syrup and Pumpkin Seed Cookies! Ta Da! Like magic I have created a new recipe by accident and they tasted pretty good too… I’ve called them cookies as they were chewy inside but crisp on the outside. The different syrups helped to create a lovely rich caramel flavour and the seeds added a nutty taste and extra bite to each mouthful.

I won’t post the recipe since I was making it up as I went along, so don’t actually know quantities of the ingredients I used!

So the lesson learned is no matter what is going wrong with your cooking or baking, there is always a way to rescue the recipe! No need to give up and waste all the ingredients (and hard work!) half way through as a good cook can improvise! 🙂

Happy experimenting folks!

Tofu Stir Fry with Chicken and Chorizo rice

Chorizo and Chicken Rice with Tofu and Vegetable Stir Fry

Tofu Stir Fry with Chicken and Chorizo Rice

Tofu Stir Fry with Chicken and Chorizo Rice

I have previously posted a recipe for Macau Portuguese Baked Rice. This time I have used the same flavour combinations but simplified the recipe for a quicker meal that takes less than 30 minutes to put together and serve for a mid week dinner. Refer to the previous recipe, but skip the cheese and boiled eggs so the rice is only steamed on the stove. I poached some chicken with cloves, bay leaves and garlic then left it in the fridge, for when I was cooking this dish. However any left over roast chicken will work too.

Chorizo and Chicken Rice

Chorizo and Chicken Rice

To go with the rice, I quickly stir-fried some ready cooked fried tofu with some chopped leeks, mange tout, celery and mushrooms. These are basically the vegetables I had in the fridge/freezer so any you have to use up could work too.

Tofu Stir Fry

Tofu Stir Fry

Fried tofu is a great vegetarian staple to have in the fridge for a quick and nutritious meal. They can be bought in bags in Asian supermarkets (look in the fridges) or you can deep fry your own tofu.

Fried Tofu Sticks

Fried Tofu Sticks

To add flavour to the tofu and vegetables, I used a couple of table spoons of vegetarian stir-fry sauce (an alternative to oyster sauce), light and dark soy sauce, and sesame oil. The tofu soaks up all the flavours like a sponge, so you can add what ever you like to the sauce. I added a few splashes of water too as the dish was a little too dry. Remember not to over cook the vegetables as you’re looking for the crunchy texture to contrast the soft tofu!

Tofu Stir Fry with Chicken and Chorizo rice

Tofu Stir Fry with Chicken and Chorizo rice

This tofu dish can be served with plain rice or egg fried rice for a filling vegetarian meal.

If you are avoiding gluten, double check the label of the chorizo and cooking sauces for gluten. Gluten free versions can usually be found!

Sweet and Spicy Popcorn

Spicy and Sweet Popcorn

Spicy and Sweet Popcorn

When the cupboards are bare and you really want a snack then having a bag of popcorn kernels will always save the day! I went through a phase a while ago of trying out different flavour combinations of sweet and savoury popcorn so usually have a bag of popcorn at the back of the cupboard. Today I dug it out and made myself an afternoon snack. 

Paprika, Cayenne Pepper, Cinnamon, salt and sugar

Paprika, Cayenne Pepper, Cinnamon, Salt and Sugar

Today I fancied a sweet and spicy popcorn so used: Paprika, Cayenne Pepper, Cinnamon, Salt and Sugar. The paprika was mainly for the colour so I used slightly more of it. The salt helped to balance out the sugar so it wasn’t overly sweet…

Popcorn kernals

Popcorn kernels

To pop the kernels:

  • Add a tablespoon of oil to a sauce pan that has a tight fitting lid. Heat the oil over a medium heat and add the spice mix. Stir it all up so the oil is flavoured evenly.
  • Then add a few tablespoons of popcorn kernels shaking it all up then stick the lid on the pan. To avoid burning, shake the pan a couple of times whilst the steam is building up in the pan.
  • Once the kernels start to pop then turn the heat up high and keep shaking the pan to get the un-popped kernels to the bottom and stop all from burning! Turn off the heat once the popping reduces to every 2-3 seconds.
  • Discard any un-popped kernels and eat immediately!
Spiced Sweet Popcorn

Spiced Sweet Popcorn

I like the way the popcorn colours with the spices used. However I think I’ll use white sugar next time as the brown sugar seemed the ‘burn’ quite quickly.

Spicy and Sweet Popcorn

Spicy and Sweet Popcorn

There are lots of different flavours that can be used with popcorn. Check out this website for more ideas.