Myanmar Mangoes

Mango and Avocado Salsa

Mango and Avocado Salsa

Mango and Avocado Salsa

Mango and Avocado Salsa

After spending three months in South East Asia and mostly eating fresh local mangos for breakfast (because anything more would have just sent me back to sleep) I find the same breakfast in the UK just doesn’t cut it!

Myanmar Mangoes

Myanmar Mangoes

This morning I was highly disappointed with the mango that I’d just bought from the supermarket, finding it already blackened inside and not nearly as sweet as the ones I’d grown accustomed to in Myanmar…

My Myanmar Breakfasts

My Myanmar Breakfasts

However it did remind me about to post this basic recipe of Mango and Avocado salsa! A great addition to any barbecue spread or with some lightly grilled fish for a light summery dinner. There is a fair bit of chopping but it all just gets tossed together right before eating so no cooking involved!

Mango and Avocado Salsa Ingredients

Mango and Avocado Salsa Ingredients

Ingredients:

  • Fresh mango, cubed
  • Half a cucumber, peeled, de-seeded and sliced
  • Ripe avocado, cubed
  • Lime, quartered and juiced
  • Red chilli pepper, de-seeded and finely chopped
  • Handful of coriander, chopped
  • Red onion, finely diced (I forgot this bit!)

Method: 

  • Mix everything up just before serving!

The mangoes and avocado are sweet and soft, the cucumber and onion adds texture, whilst the coriander, lime and chilli pepper add extra punchy flavours. A very simple salad that will always remind me of the delicious Myanmar mangoes… 😀

Burmese Tomato Salad

Burmese Tomato Salad

Burmese Tomato Salad

Burmese Tomato Salad

Burmese Tomato Salad

Three weeks into my stay in Yangon, Myanmar (Burma) I’ve settled in and have tried lots of new recipes. I’m attempting to build up a good all-round knowledge of local foods so I can recreate them when I eventually return home.

One thing that stands out about my stay in Yangon is the incredible heat! It’s so hot that if you go outside between the hours of 8am to 5pm, its like asking for a bucket of water to be thrown at you with the amount you end up sweating! Eugh! The infrastrusture of this emerging economy is also in it’s infancy so frequent power cuts happen. Often large businesses will have back up generators but where I am currently volunteering (a social enterprise) such luxuries are not within easy reach. It doesnt happen too often so I shouldn’t complain! 🙂

With it being so hot, I find my appetite has lessened and I often don’t feel hungry. Rice and noodles are the staple diet here but often eating hot meals is the last thing on my mind. So the delicious Burmese salads are always a light meal choice to turn to. Back home I found that having a salad at lunch time did not keep me full for long, so I often added some protein (usually chicken) and avocado or cheese to bulk it out. Here dairy is not used in the traditional diet and good cheese is expensive and hard to find.

I could eat this tomato salad every day, three times a day if I could! The fried onions and garlic and the peanuts add texture and a creaminess to the salad whilst the tomatoes, coriander and lime juice add freshness. It’s a perfect combination and keeps me full for a long time…

Burmese Tomato Salad

Burmese Tomato Salad

Ingredients

  • 4 fresh tomatoes (halved and thinly sliced)
  • small bunch fresh coriander (chopped)
  • small handful of fried onions
  • smal handful of fried garlic
  • quartre of a white cabbage (finely sliced)
  • small handful of roasted peanuts (lightly pounded)
  • Juice of one lime
  • 1 tsp peanut oil
  • 1 tsp fish sauce (leave out if you want to make it vegetarian)

Method:

  • Mix all the ingredients together just before you want to eat it, simple! 😀

A lot of Myanmar salads seem to have the same base ingredients, try this salad with some slices of deep fried tofu added (tofu salad). It is another amazing light salad to try out.

Duck Egg Curry

Myanmar (Burmese) Duck Egg Curry

Myanmar Duck Egg Curry

Egg curry is a new idea for me, and it really surprised me that I hadn’t considered it before! I tend to bake more than I cook so always have eggs in the house. But often the eggs go passed their best as I struggle to use them up. The main reason I don’t do much cooking is because I don’t like to cook unless there is someone else to cook for. These days my partner is living away as he has gone to university as a mature student, so I find myself having dinner at my sister’s or my mum’s house. Cooking for one can be pretty dull since I tend to stick to a few one-pot recipes.

This Duck Egg Curry I tried for the first time on a recent trip to Myanmar has become my new ‘one pot curry’ recipe! It’s also a tasty way to use up all those left over eggs without having to break out the butter and sugar to bake a cheeky cake… Best served with fresh boiled rice and some stir fried greens!

This dish is commonly found in Myanmar and is a very popular lunch time meal as it is very cheap to make as well as being a quick meal to cook in the morning. I was only in Myanmar for a couple of weeks but learnt that there is still very much a culture of shopping in local wet-markets first thing in the morning. There are more supermarkets popping up in the cities but not many people have refrigerators and electricity is temperamental so it still isn’t practical to stockpile perishable foods.

There are very few ingredients in Duck Egg Curry so can be made from store-cupboard  ingredients if there is no time to visit the market in the morning before the working day starts. In Myanmar it is still the norm that women in the household do the shopping and cooking. As wages are low, it is common to see workers carrying metal tiffin lunch boxes to work in the morning, usually a layer of rice, some curry and some stir fried vegetables. When my colleagues brought out their lunches, I was always excited to see what they had prepared that day. It was so much more exciting than the standard English lunch of sandwiches!

Myanmar Egg Curry

Myanmar Egg Curry

*Recipe courtesy of Harmoneat

Ingredients:

  • 6 Duck Eggs
  • 3 Tomatoes, roughly chopped
  • Shrimp Paste (can fish sauce instead or omit for a vegetarian version)
  • Water
  • 2 tbs Vegetable Oil
  • Salt, to taste
  • 1 Dried Red Chilli
  • 6 Inches Ginger Root, peeled and roughly chopped
  • 2 Cloves of Garlic, peeled and roughly chopped
  • 4 Shallots, peeled and roughly chopped

Method:

  • Soak the dried chilli in some warm water for 10 minutes to soften
  • Boil the duck eggs for 5 minutes until hard boiled, once boiled peel the eggs and cut in half horizontally then set to one side
  • Make the curry paste by pounding the re-hydrated chilli, garlic, ginger and shallots in a pestle and mortar until you get a smooth paste (use a blender if you want to be are short on time)
  • In a deep sided frying pan (with a lid) stir fry the curry paste in the vegetable oil to release the fragrance of the spices, around 3 minutes
  • Add the chopped tomatoes, shrimp paste, and a cup of water. Stir to combine and make a thick curry sauce
  • Place all the egg halves face down into the sauce in one even layer and simmer for a few minutes, before turning all the eggs over so the yolks are facing upwards
  • If the sauce is very thick, add some more water before putting the lid on the pan and simmering for 10-15 minutes. Add salt for seasoning
Duck Egg Curry

Duck Egg Curry

I have cooked this recipe using chicken eggs as a substitute very successfully, as duck eggs are a bit harder to come by back home in the UK! This dish is pretty healthy as not a huge amount of oil is used and the eggs yolks bring richness to the curry. It still tastes great without the shrimp paste for vegetarians; I once forgot to add it! 😉

Red Curry Paste

Red Curry Paste

This red curry paste is a very simple recipe that forms the basis for ‘red’ curries in Myanmar. Make a big batch and keep a home made jar in the fridge sealed with a layer of oil for an fresh curry paste free from preservatives! 😀

For more recipes from Myanmar, check out Harmoneat’s website where you can find downloadable recipe cards. 😀

Coconut and Pineapple Layer Cake

Coconut and Pineapple Layer Cake

Coconut and Pineapple Layer Cake

Coconut and Pineapple Layer Cake

I’ve gone from hardly baking any cakes recently to two birthday cakes in one week! The first being a Chocolate and Caramel Cake (post to follow) and the second was this Coconut and Pineapple Cake. It is almost a year to the day that I last baked a Coconut Cake. I know this because the cake was made for my cousin’s birthday and this cake was made for her next birthday! What else do you bake a coconut addict than a Coconut Cake?

Since last year’s cake was a bit complicated, and this year I didn’t have as much time so I tried a simplified version with the additional flavour of pineapple to give it a twist! After lots of searching for Pineapple and Coconut cakes, I ended up using a mish-mash of recipes to tailor the cake to the ingredients I actually had to hand (I couldn’t be bothered to head to the shops!) 🙂

I am going to be the first to admit that this cake didn’t turn out too pretty, however for what it lack in the eye candy department it more than makes up for in flavour! I have a knack of trying to fit too many things in at the same time, so I was finishing the decorating of this cake whilst last minute packing for a trip to Myanmar (Burma) the next day. I’d like to think that if I had more time I would have spent more time on the presentation, for example getting some dried pineapple slices and making them into pretty flowers to top the cake. However my attempts to get some at the local supermarket were fruitless (excuse the pun!) and I couldn’t think of anything else to do, so a bit of quick chocolate writing was what I settled for… any suggestions for future cake decorating in the comments box below please! 😀

Although this cake has a few steps, it is actually quite simple to make as the pineapple filling and the coconut custard for the frosting can be easily made whilst the sponge is baking in the oven! The ingredients are mostly store cupboard basics so should be fairly easy to get together. Feel free to use fresh pineapple if you can get it (and have the time to cut it up and prep it!)

Cake: 

  • 175 g Self Raising Flour
  • 1.5 tsp Baking powder
  • 130 g Caster sugar
  • 3 Medium eggs
  • 130 g Butter, melted
  • 2 tbs Coconut cream
  • 60 g Desiccated coconut
Pineapple Filling

Pineapple Filling

Pineapple filling:

  • 540 g Can of pineapple (340 g drained weight)
  • 2 tbs Cornflour
Coconut Custard

Coconut Custard

Coconut Cream Frosting:

  • 370 ml Coconut milk
  • 2 Egg yolks
  • 20 g Caster sugar
  • 2 tbs Cornflour
  • 300 ml Double cream

To Decorate:

  •  20 g Desiccated coconut, toasted
Coconut Cream and Pineapple Cake

Coconut Cream and Pineapple Cake

Method:

For the Cake:

  • Using an electric whisk, beat the eggs and sugar until you see ribbons trails when stirred, lightly beat in the coconut cream
  • Slowly stir in the melted butter, try to avoid knocking too much air out of the mixture
  • Sift in the flour and baking powder along with the desiccated coconut, lightly combine so it is just mixed together
  • Bake the batter in a lined round 23 cm spring form cake tin for 25 minutes, 180 degrees C (fan oven)
  • Remove cake from the tin and allow to cool completely

For the Pineapple filling:

  • Pour the pineapple juice/syrup from the can into a jug and combine with the cornflour until smooth
  • Chop up the pineapple into small chunks and put into a saucepan
  • Warm up the pineapples in the pan and add the cornflour and juice mixture, keep on a low heat and the mixture will slowly thicken to look similar to apple sauce
  • Leave to one side to cool completely

For the Coconut cream frosting:

  • Make a coconut custard by combining the egg yolks with the cornflour into a smooth paste, warm in a saucepan and slowly add the coconut milk into the thicken egg mixture so you have a smooth custard
  • Keeping the pan on a low heat, add the sugar and continuously whisk until the mixture forms a very thick custard, don’t allow the custard to stick to the bottom of the pan
  • Set the custard to one side until completely cold. This can be made ahead and refrigerated, but ensure you cover the custard with cling film to prevent it from forming a skin
  • Whip up the double cream until peaks form, add the coconut custard and lightly whisk to combine

To assemble and decorate:

  • Cut the cake through the middle to create two layers, using the top as the bottom layer
  • Cover the bottom layer with a layer of the coconut cream frosting, then add the pineapple filling on top. I only used half the pineapple filling in the end as I was worried it would be too much!
  • Add the second layer of sponge then completely cover the whole cake with the left over frosting
  • Decorate with the toasted desiccated coconut
Coconut Cream Layer Cake

Coconut Cream and Pineapple Layer Cake

As you can see from the, slightly dodgy, photo of the inside of the cake it is packed with filling and cream. The contrast in textures and flavours worked well, the cake sponge was a little on the dry side but the cream helped to balance this out. All in all, a tasty version of the coconut cake in less than half the time of the original! 🙂


Spanish Orange and Almond Cake Caramel top

Spanish Orange and Almond Cake (Gluten Free and Dairy Free): Clandestine Cake Club meet No. 2

Spanish Orange and Almond Cake with Almond Praline

Spanish Orange and Almond Cake with Almond Praline

I have previously written about the Clandestine Cake Club of which I am a proud member. The mission statement for the CCC is: Bake, Eat and Talk about Cake, so you can see where this post is going… 🙂

The last time I attended a CCC event, I took the Pistachio, Cardamom and Yoghurt Cake and the theme was ‘nouveaux’ -trying out a new recipe or using a new cook book or cake tin etc. This event theme was: ‘the Great British Bake Off! The ultimate baking-together experience. Whether you choose a recipe from one of the winners or something that was featured on the programme, even if you want to recreate the tent in cake, the choice is yours.’

I have to admit that I didn’t actually go with the theme as I forgot all about it! 🙂 The idea was to spend two hours baking a cake that could then be shared with fellow bakers and their friends/family later on. I loved the idea of spending the afternoon baking with people who love cake as much as I do, sharing tips and learning from each other. This is also one of the main reasons I write a food blog! 🙂

So that takes me to the inspiration for my cake. Wendy at Chez Chloe wrote about this recipe for Orange and Almond Cake, and I was absolutely hooked on the simplicity of the recipe!  The recipe if gluten free and dairy free (if you skip the caramel top!) Check out Wendy’s post for a simple step-by-step guide on how to prepare this cake.

With only having 2 hours to bake and decorate a cake, I wanted to go with something very simple but delivers on flavour too. The idea for the additional almond caramel top came from a pear and almond cake that I’ve had in a local coffee shop called ‘Teacup’. I generally love caramel and thought it would be a nice decorative feature that doesn’t rely on the cake being cooled before it can be added on.

Spanish Orange and Almond Cake

Spanish Orange and Almond Cake

So here is how it was done:

Step one: Prepare the cake as Wendy suggests- I used one less egg and an 18″ round loose bottom cake tin. However this meant that the cake took a lot longer to bake, so I would suggest a 23″ round tin.

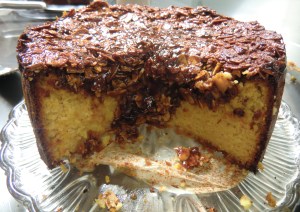
Step two: While the cake is baking make a basic caramel by simmering 125g butter, 125g butter, 50ml milk and 1/2 tsp sea salt in a saucepan until it is smooth and a deep caramel colour. Mix in 150g toasted almond flakes.

Step three: When the cake is cooked through, pour all the almond caramel mix on top of the cake and bake for another 10 minutes.

Almond Caramel Topping

Almond Caramel Topping

The cake should be served slightly warm, with a little cream if that takes your fancy! I think we could have done with letting it cool a little before cutting into it, however the extra baking time and hungry cake fans meant that this just wasn’t an option! 😀

Spanish Orange and Almond Cake Caramel top

Spanish Orange and Almond Cake Caramel top

The cake was super moist and the slightly bitter caramel topping did a great job of seeping into the top of the cake to create a lovely balance of flavours. Check out Helena’s official write up of the event!

I cannot finish this post without mentioning the amazing Sean from ‘Cook Manchester’ who provide fully equipped professional kitchen hire for small businesses. I had a good chat with Sean about his business and the kinds of people who have used the facilities. He’s a really inspiring guy who is passionate about  food and helping others to realise their dreams of starting their own food business. Please check out the website and share with friends who may be interested in finding out more about the facilities.

Bake-Along at Cook Manchester

Bake-Along at Cook Manchester


CCC-Bake Along

CCC-Bake Along


Mexican Night: Guacamole, Refried Beans, Salsa, Nachos and Buffalo Wings!

Mexican Night

Mexican Night: Nachos, Guacamole, and Salsa

April 2014 has flown by with little blogging activity from me. Apologies for my absence, however it was my birthday at the beginning of the month and the Easter bank holiday came and went, all in all it has been incredibly busy but so much fun! 🙂

I’ve not cooking a huge amount, and when I have I’ve been trying to take photos for the blog but not always with great success! So this meal was prepared for a night in with some friends to go with a few drinks…

One of the many birthday treats I had was to go to a ‘Latin American’ style restaurant where we started off with nachos and spicy chicken wings. This was my inspiration for this collection of nibbles, full of flavour and easy to eat with your fingers over a long evening of chatter with good company!

Let’s start with the Guacamole! I’ve never made it before, as it is only recently that I’ve eaten avocado. I’ve been informed that this was the ‘best guacamole ever tasted’, so a pretty good recipe!

http://www.foodnetwork.com/recipes/alton-brown/guacamole-recipe.html

Guacamole

This recipe can be found here. I think the secret ingredient is the ground cumin which gives it a nice depth of flavour. Make it ahead so the flavours have time to melt into each other!

Then there is the Salsa!

Salsa

Salsa

This salsa recipe calls for one jalapeño chilli which I didn’t have but I only had pickled jalapeños so substituted that instead. My partner reliably informs me that this is similar to Afghan ‘Salata’. Another recipes that transcends cultures!

Cheesy Nachos

Cheesy Nachos

This is a fairly straight forward recipe for grilled nachos; tortilla chips topped with sour cream, jalapeños, refried beans and plenty of cheese!

Now for the chicken wings. I went with this recipe for Baked Buffalo Wings, as it was pretty straightforward and promised a crispy spiced finish.

Buffalo Wings Preparation

Buffalo Wings Preparation

The key to this recipe is leaving the coated wings in the fridge for at least one hour to dry out. I roasted them in two separate trays to ensure they weren’t over crowded.

Buffalo Wings

Buffalo Wings

Before baking, each piece is dunked into a an emulsion of butter and chilli sauce. Needless to say, they were delicious! Apologies for the terrible photo! 😦


Roasted Vegetable Terrine

Roasted Vegetable Terrine

Roasted Vegetable Terrine

Roasted Vegetable Terrine

I’ve never attempted a ‘terrine’ before. I like the look of all the layers of colourful vegetables and have seen it being done on cookery programmes so decided to give it a whirl as part of a Mother’s Day lunch…

I loosely based it on this recipe  for Roasted Vegetable and Goats Cheese Terrine but my mum isn’t keen on goats cheese so I went for mozzarella instead. I also went to town when buying vegetables so used ALOT of different ones. In hindsight it is probably better to stick to a few vegetables that you can repeat the layers with, less time consuming to prepare and allowing the flavours to shine through individually too…

I pretty much spent three hours individually roasting the slices of vegetables and pan frying some. I seasoned with salt and pepper as I went along and added extra flavour by using a layer of sun-dried tomato paste in the middle. You can use whatever takes your fancy! 🙂

So this is how it was constructed:

Vegetable Terrine- Aubergine Layer

Vegetable Terrine- Aubergine Layer

Vegetable Terrine- Sweet Potato Layer

Vegetable Terrine- Sweet Potato Layer

Vegetable Terrine- Sweet Potato Layer

Vegetable Terrine- Sweet Potato Layer

Vegetable Terrine- Red Pepper Layer

Vegetable Terrine- Red Pepper Layer

Vegetable Terrine- Mozzarella Layer

Vegetable Terrine- Mozzarella Layer

Vegetable Terrine- Sundried Tomato Paste Layer

Vegetable Terrine- Sun-dried Tomato Paste Layer

Vegetable Terrine- Portabello Mushroom Layer

Vegetable Terrine- Portabello Mushroom Layer

Vegetable Terrine- Courgette Layer

Vegetable Terrine- Courgette Layer

Vegetable Terrine- Artichoke Layer

Vegetable Terrine- Artichoke Layer

Vegetable Terrine-  Asparagus Layer

Vegetable Terrine- Asparagus Layer

Vegetable Terrine-  Final layer!

Vegetable Terrine- Final layer!

Vegetable Terrine-  Ready for the fridge

Vegetable Terrine- Ready for the fridge


The terrine needs to be made ahead so that it can be kept in the fridge for at least 8 hours to allow the flavours to infuse. I put a heavy bottle on top to squash the layers down so that the terrine holds it shape on turning it out.

Vegetable Terrine - The result!

Vegetable Terrine – The result!

I served the terrine with rosemary and garlic roasted chicken, garlic hassle-back potatoes, red cabbage coleslaw and ‘no knead’ oatmeal bread- all home made!

Roasted Vegetable Terrine, Roast Chicken, Hassel-back potatoes, Red cabbage coleslaw

Roasted Vegetable Terrine, Roast Chicken, Hassel-back potatoes, Red cabbage coleslaw

The different colours and layers looked great but did fall apart a little on cutting. The flavours worked well together, but I’d use more sun-dried tomato paste and cheese next time and fewer different types of vegetables… worth the effort for a special occasion! 😀


Tofu Stir Fry with Chicken and Chorizo rice

Chorizo and Chicken Rice with Tofu and Vegetable Stir Fry

Tofu Stir Fry with Chicken and Chorizo Rice

Tofu Stir Fry with Chicken and Chorizo Rice

I have previously posted a recipe for Macau Portuguese Baked Rice. This time I have used the same flavour combinations but simplified the recipe for a quicker meal that takes less than 30 minutes to put together and serve for a mid week dinner. Refer to the previous recipe, but skip the cheese and boiled eggs so the rice is only steamed on the stove. I poached some chicken with cloves, bay leaves and garlic then left it in the fridge, for when I was cooking this dish. However any left over roast chicken will work too.

Chorizo and Chicken Rice

Chorizo and Chicken Rice

To go with the rice, I quickly stir-fried some ready cooked fried tofu with some chopped leeks, mange tout, celery and mushrooms. These are basically the vegetables I had in the fridge/freezer so any you have to use up could work too.

Tofu Stir Fry

Tofu Stir Fry

Fried tofu is a great vegetarian staple to have in the fridge for a quick and nutritious meal. They can be bought in bags in Asian supermarkets (look in the fridges) or you can deep fry your own tofu.

Fried Tofu Sticks

Fried Tofu Sticks

To add flavour to the tofu and vegetables, I used a couple of table spoons of vegetarian stir-fry sauce (an alternative to oyster sauce), light and dark soy sauce, and sesame oil. The tofu soaks up all the flavours like a sponge, so you can add what ever you like to the sauce. I added a few splashes of water too as the dish was a little too dry. Remember not to over cook the vegetables as you’re looking for the crunchy texture to contrast the soft tofu!

Tofu Stir Fry with Chicken and Chorizo rice

Tofu Stir Fry with Chicken and Chorizo rice

This tofu dish can be served with plain rice or egg fried rice for a filling vegetarian meal.

If you are avoiding gluten, double check the label of the chorizo and cooking sauces for gluten. Gluten free versions can usually be found!

Goats Cheese, Sun-Dried Tomato and Pesto Tart

Goats Cheese, Sun-Dried Tomato and Pesto Tart

Goats Cheese, Sun-Dried Tomato and Pesto Tart

This was a quick last minute starter made for a casual dinner with friends. I has originally planned to make some soup but missed a vital ingredient off the shopping list. After a quick scout around the fridge and freezer I found some puff pastry and goats cheese, so the beginnings of the tart were born!

I made some basil pesto with half a bunch of left over basil, some toasted pine nuts and olive oil (no parmesan as I had none!). All were blitzed in the blender with a little salt and pepper to taste.

Basil Pesto

Basil Pesto

To assemble: Roll out the puff pastry onto a baking sheet (I didn’t line mine so it stuck a little, best learn from my mistakes!) then spread the pesto thinly onto the pastry leaving about 1cm border around the edge. Then add the toppings, I used goats cheese and sun-dried tomatoes with some extra pine nuts scattered over.

To bake: Stick it in a hot oven for 15 minutes but keep an eye on it after 10 minutes.

To serve: Cut up into slices and serve with salad (I halved some cucumber slices and cherry tomatoes and dressed them with left over pesto)

Et voila! A quick and easy starter enjoyed by adults and kids alike…

GF and Vegan: Sweet Potato Vermicelli with Vegetables in Blackbean Sauce

Sweet Potato Noodles with Vegetables in Blackbean Sauce

Sweet Potato Noodles with Vegetables in Black Bean Sauce

Have you ever heard of Sweet Potato Vermicelli?! Well I’ve had this packet of dried noodles in my cupboard for about 2 years and had forgotten all about it until today. I’m not even sure why I bought it in the first place! Maybe because it is something I hadn’t tried before?  When the noodles are dry they are grey but once cooked they become clear. There are only two ingredients to these noodles; sweet potato flour and water!

Sweet Potato Vermicelli

Sweet Potato Vermicelli

After over-indulging in pancakes for Shrove Tuesday, tonight’s dinner really needed to be healthy and nutritious! So I dug out all the vegetables from the fridge and decided to make a stir fry in black bean sauce. Fermented black beans can be found in Chinese supermarkets in bottles. Ideally you would use the dried black beans rather than the bottles of ready made black bean sauce, however if you want to make this recipe super quick and easy then feel free to use bottled sauces. 

Unfortunately the packet of noodles didn’t have any cooking instructions so I decided to guess it. In hindsight, I should have just looked it up online as there are plenty of websites offering advice! Lessons learned and all that… 🙂

Sauce ingredients

Sauce ingredients

Ingredients

  • 1 packet of Sweet Potato Vermicelli
  • 3tbs fermented blackbeans
  • 4 cloves of garlic (chopped)
  • 1 tsp sea salt
  • 0.5 tsp sugar
  • 1 tbs light soy sauce
  • 1 tbs dark soy sauce
  • 1 tbs sesame oil
  • 1 tbs vegetable oil
  • 1 tbs corn flour
  • Water
  • Stir frying vegetables (I used broccoli, courgettes, carrots and leeks)
  • Coriander (I had a bunch of stalks left over so used them)
Black Bean Sauce

Black Bean Sauce

Method

  • Boil the noodles for 5 minutes (you should then ‘shock’ them in cold water and then coat in sesame oil so they don’t get too sticky)
  • Blanch vegetables that need to be pre-cooked and set aside (I threw them in with the noodles)
  • Mix the black beans, garlic, sugar, salt, soy sauces, salt and sesame oil together in a bowl
  • Heat up the vegetable oil and and stir fry the leeks and courgettes
  • Add pre mixed black bean sauce ingredients to the pan and stir fry for a couple of minutes
  • Add water to create the gravy, thickening with the cornflour (to avoid lumps mix the cornflour with water to create a paste before adding)
  • Add the part cooked vegetables and coriander into the sauce and stir around then add the noodles, tossing it all together so all noodles are coated with the sauce
Sweet Potato Noodles in Black Bean Sauce

Sweet Potato Noodles in Black Bean Sauce

This recipe makes enough for 6 people and is super filling! The Sweet Potato noodles really soak up a lot of the sauce, so the dish ends up quite dry but tasty. I think I over cooked the noodles as they were quite sticky! This may also be because I didn’t ‘shock’ them with cold water to stop the cooking process.

Overall I’d say that the sweet potato vermicelli is a tasty a alternative for people who are looking for an alternative to wheat noodles! And since it is a stir fry, very quick to cook for a mid-week meal…

I’ve also just realised that my soy sauces aren’t gluten free! So please buy GF versions if needed! 🙂